
Polar Data Catalogue Help Manual
The Polar Data Catalogue (PDC) is the data repository for the ArcticNet Network of Centres of Excellence, the Government of Canada Program for the International Polar Year (IPY), the Northern Contaminants Program (NCP), the Beaufort Regional Environmental Assessment (BREA), the Nunavut General Monitoring Plan (NGMP), the Canadian High Arctic Research Station (CHARS), and other related Canadian and international research programs.
The PDC provides an interface for registered users to enter metadata and data that are searchable by the general public through the PDC Search Tools. These are easy-to-use mapping interfaces that allow for fast and simple retrieval of spatial data in the Arctic and Antarctic. The PDC metadata records follow ISO 19115 (North American Profile) and Federal Geographic Data Committee (FGDC) standard formats to facilitate discovery and exchange with other data centres.
To upload data, contributors must be researchers with our partner organizations as well as registered users of our website. The uploaded data will be available for public search after it has been through our Quality Assurance protocols and the record has been approved.
This guide has four parts.
The first two are help sections for the various search options.
The second two are help and guidance for entering metadata and datasets.
If you have any questions or concerns, please contact PDC Support: pdc@uwaterloo.ca
Part I: Search for Data
This document guides you through the process of searching for data using user-defined criteria. Anyone can search for data using our PDC interface.
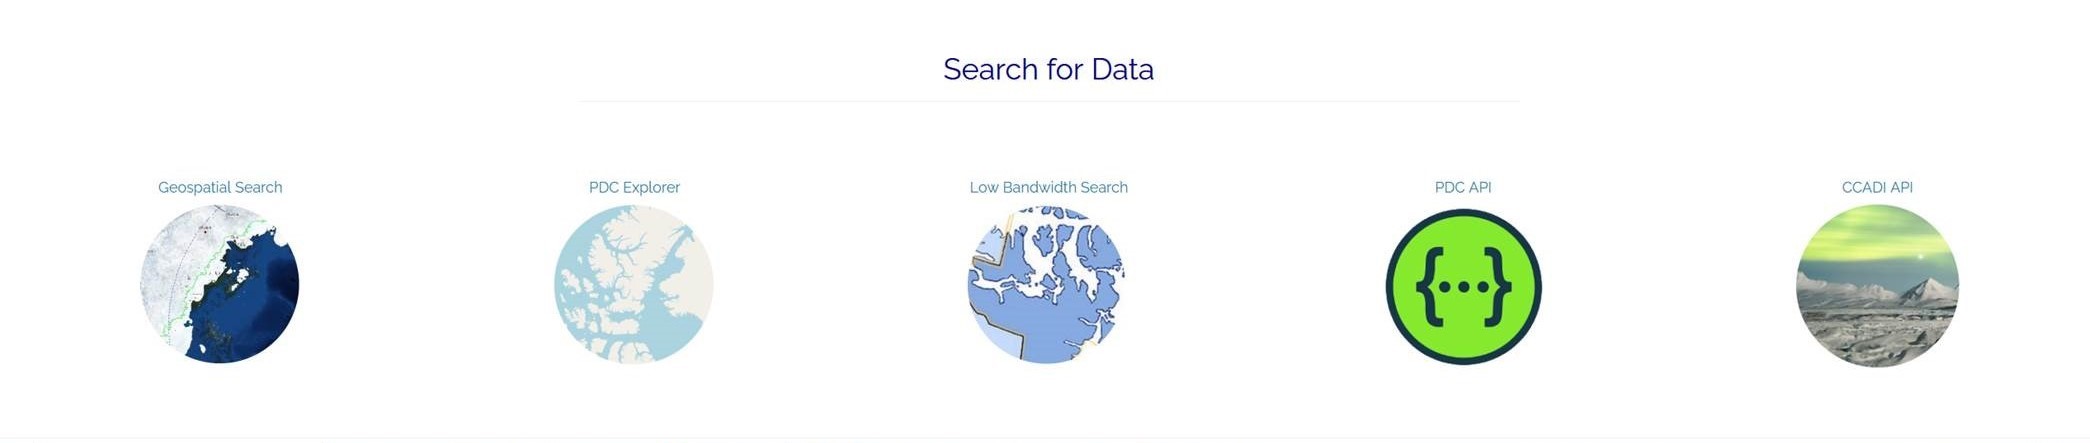
On the PDC Welcome page click on the "Find Data" button and you will be able to choose from the following search options (or click on the individual options on the left of the screen).
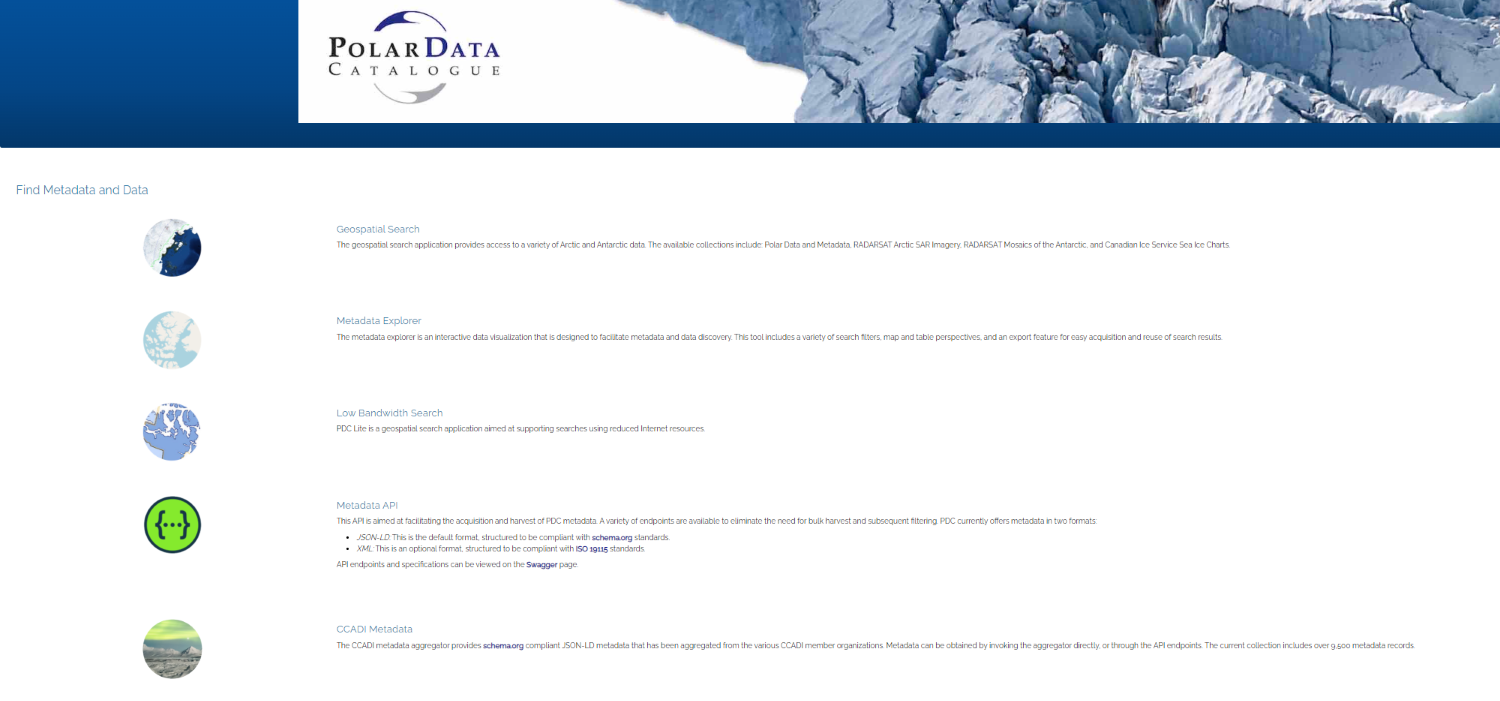
Geospatial Search
The geospatial search application provides access to a variety of Arctic and Antarctic data. There are four available collections: Polar Data and Metadata, RADARSAT Arctic SAR Imagery, RADARSAT Mosaics of the Antarctic, and Canadian Ice Service Sea Ice Charts
This search interface can also be accessed from PDC Input Home page or via the "Submit Data" button on the PDC Welcome page.
The PDC Geospatial Search interface is divided into two panels.
The left panel shows the map of the poles in polar stereographic projection. You can use the tab on the upper left corner of the left panel to switch between the Arctic, Antarctic, and GIS Viewer. Tools are provided to explore the map, including zoom in and zoom out. The longitude and latitude of the cursor location is shown in the lower right corner of the map.
The right panel provides the interface to do the search and show the search results.
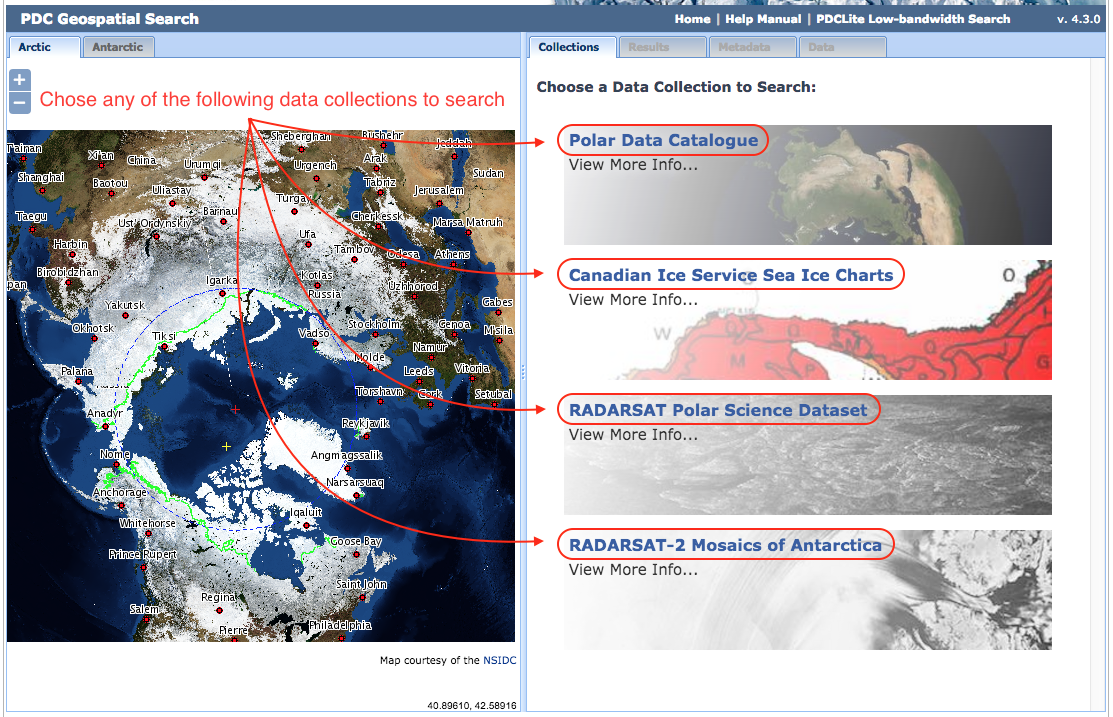
Choose one of the four data collections. The “Polar Data Catalogue” collection includes various non-exclusive research datasets, while the “Canadian Ice Service Sea Ice Charts” collection includes charts of data, and the “RADARSAT” Datasets include RADARSAT imagery of Arctic and Antarctic sea ice. You do not need to register to download most of the data in our system, or to search for RADARSAT imagery; however, registration is required to download RADARSAT imagery.
Read and agree to the Terms of Use to continue.
Polar Data Catalogue Search
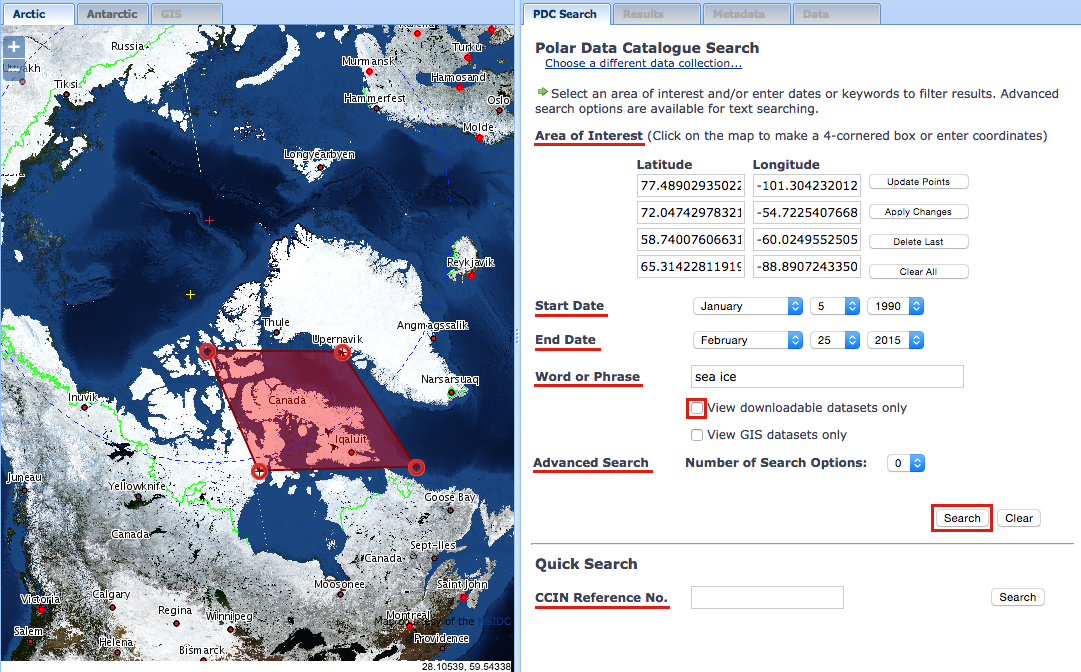
Search for Data
There are multiple fields to search by, including: Area of Interest, Time Period, Word or Phrase, CCIN Reference Number, as well as the Advanced Search option. The user can use just one field, or a combination of multiple fields to search by.
These three search types (Geographic, Keyword, and Time Period) can be combined to further narrow the results.
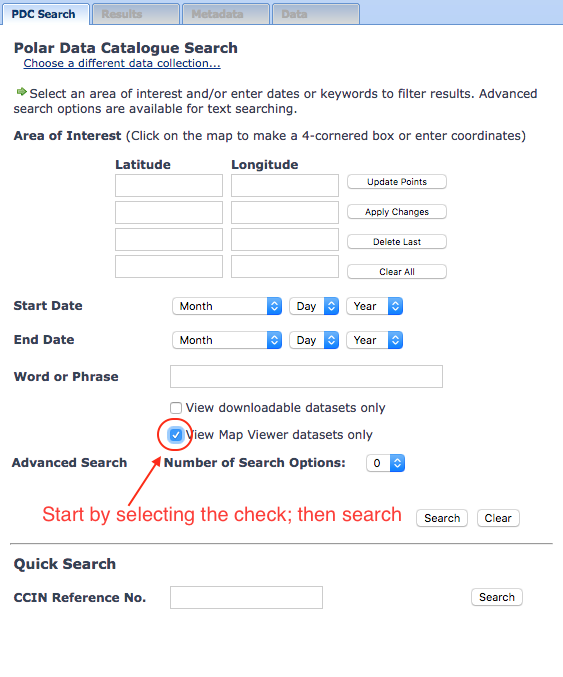
You can also search with the “View downloadable datasets only” tool. This narrows your search to only include datasets that are stored locally and are immediately downloadable. This is useful, because many of the records in the database are only metadata records.
Click the “Search” button to proceed to the results.
View Search Results
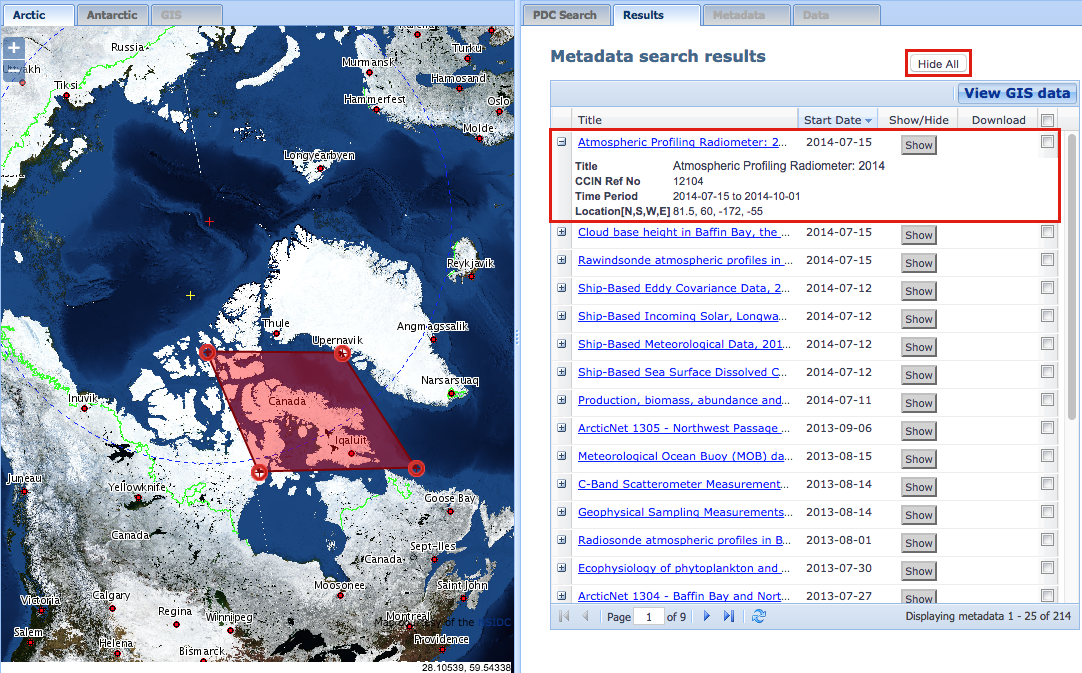
Once you have completed your search, the search results are listed in the right panel under the “Results” tab. The total number of results returned by the search engine is displayed at the bottom right corner of the page. If the search returns more than 25 results, you can use the blue navigation arrows at the bottom of the right panel to go through the pages, showing 25 results at a time. For each record, the results page shows the Title, Start Date, a “Show/Hide” button (to show the study site on the map in the left panel), and a Download link, if the data can be downloaded directly from the PDC. All results can be sorted by “Ascending” or “Descending” order of the column fields (e.g., sorted alphabetically by Title).
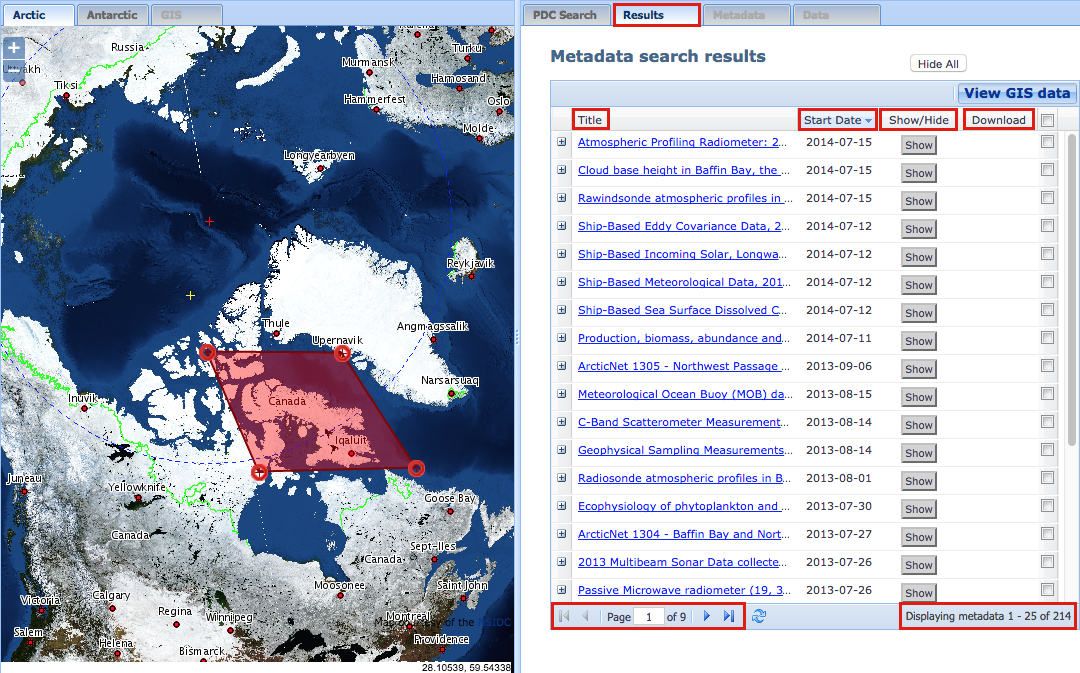
The data coverage boundary box, or the specific geographic location of the data record, will be shown on the map in the left panel when the “Show/Hide” button is clicked. Clicking “Hide all” will clear all the location information for the data records shown on the map.
Download Data
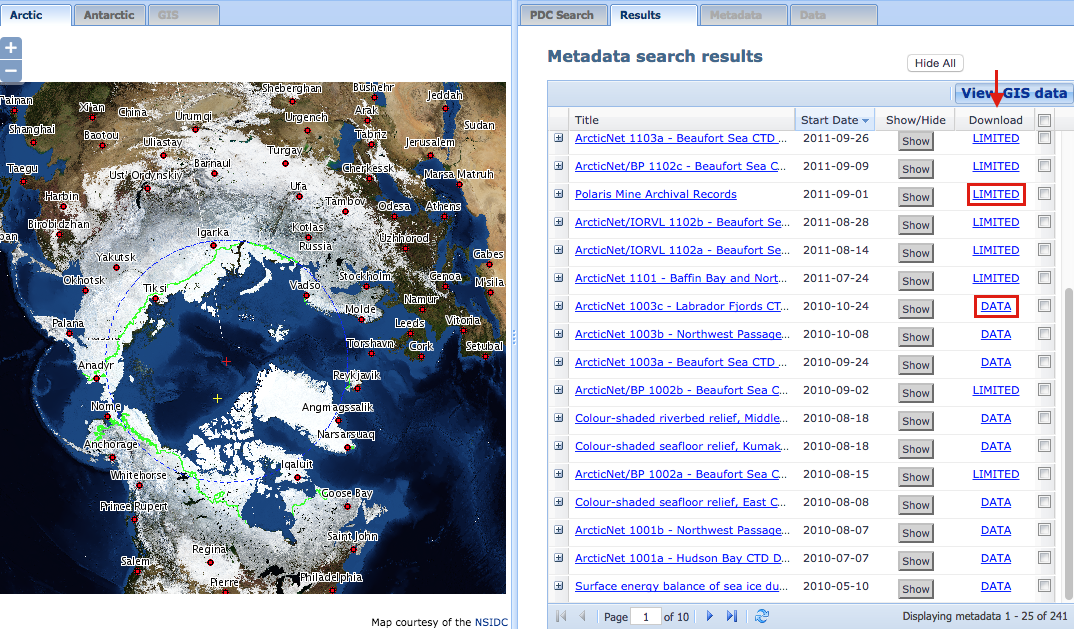
The “Download” column in the results table under the “Results” tab provides information about data availability in the PDC. If the dataset can be directly downloaded, “DATA” will be indicated, as a link to the data files. “LIMITED” will be indicated for datasets that have limited access.
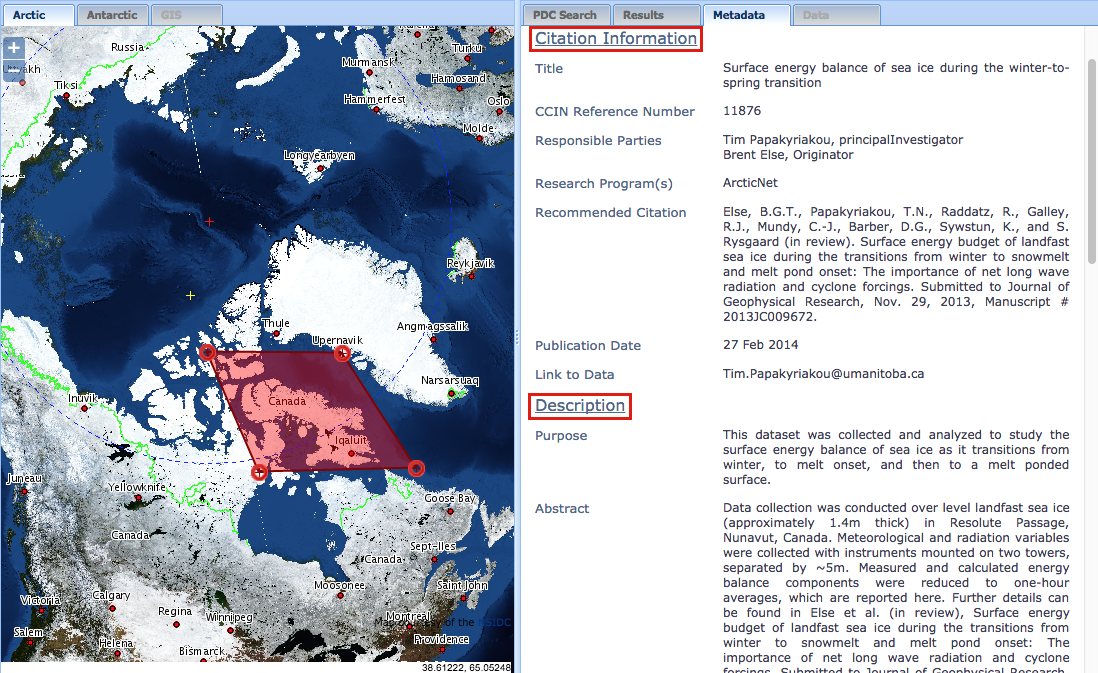
If the “Download” column is empty, the data is not directly available. In this case, you can go under the “Metadata” tab (by clicking on the Title of the record), and check the “Link to Data,” or “Point of Contact” fields for contact information. You may contact this person to enquire about obtaining the data.
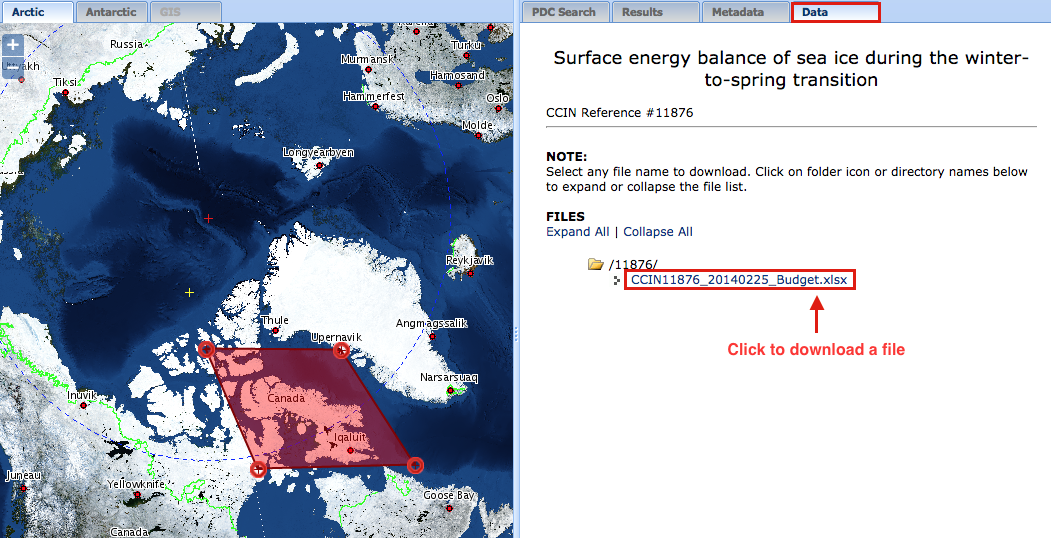
To download the data that is readily available, click on the “DATA” link, which will direct you to the “Data” tab and includes all the downloadable data files. To download specific individual files, you may click “Expand All” to see the names of all the files.
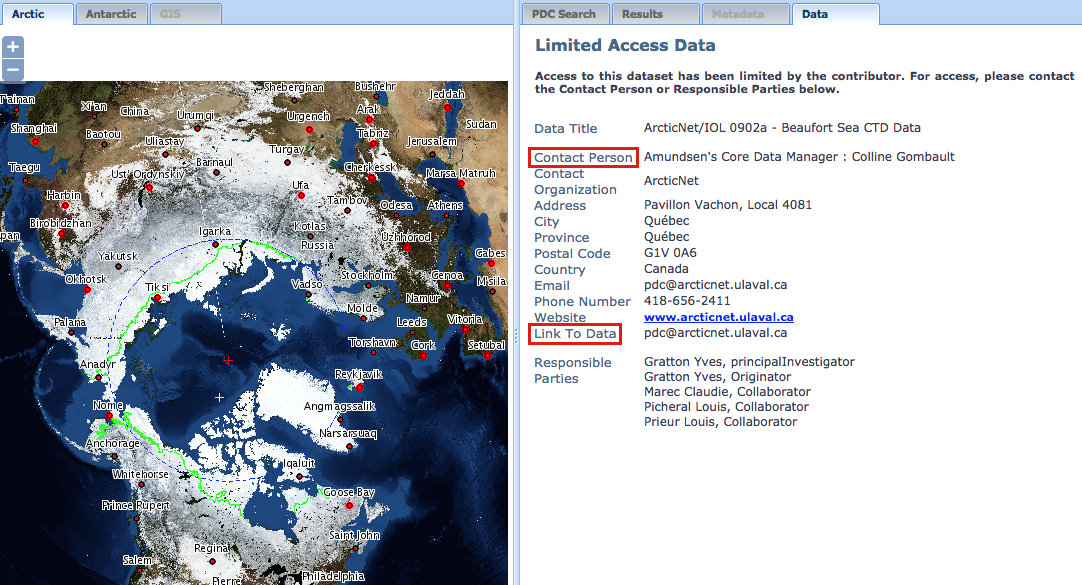
If the data is limited, then click on the “LIMITED” link. This will direct you to a page with information about the dataset, including the Contact Person, to whom enquiries about obtaining the data should be directed towards.
Map Viewer
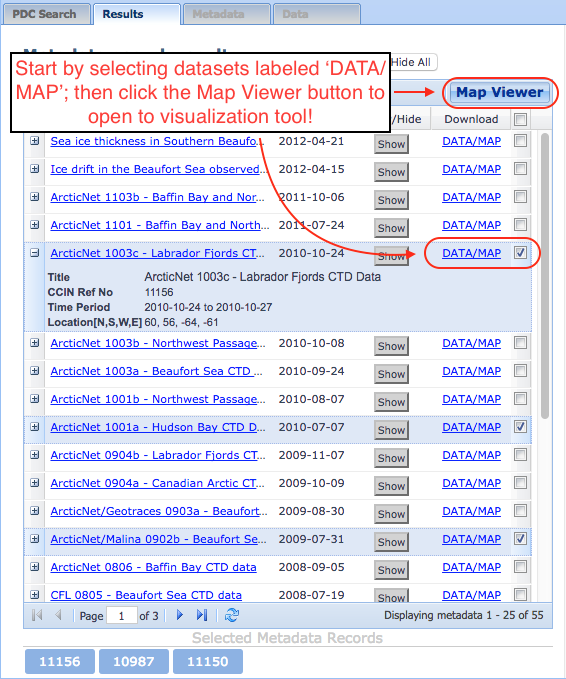
The Map Viewer visualization tool allows you to play with and discover datasets available in the PDC Search. Any dataset with the property ‘DATA/MAP’ can be viewed; select the records with this property in the Polar Data Catalogue Search results and then the Map Viewer button. You can specifically search for viewable datasets by checking the ‘View Map Viewer Datasets Only’ checkbox on the search page.
The Map Viewer application currently can deal with three different types of data: CTD, Mooring, and GIS. Each data type has its own visualization capabilities.
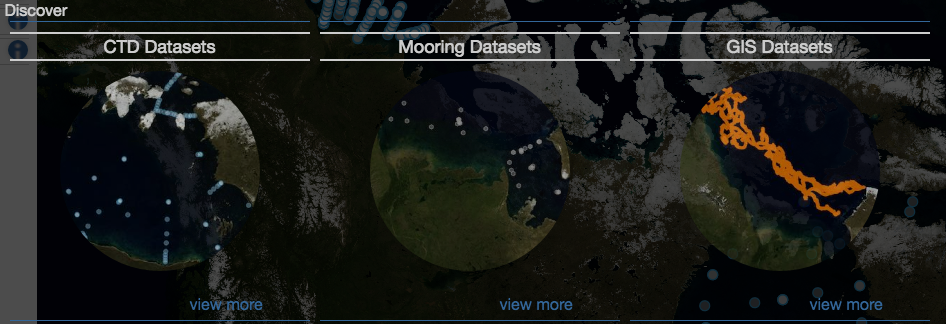
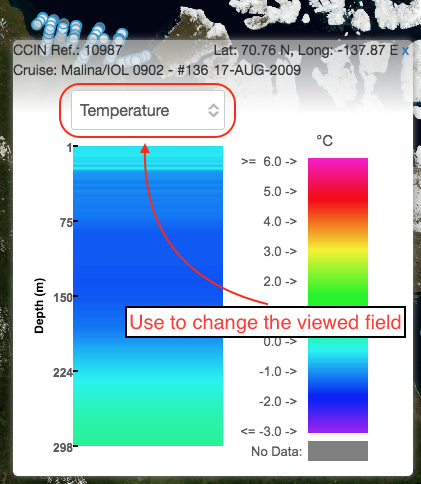
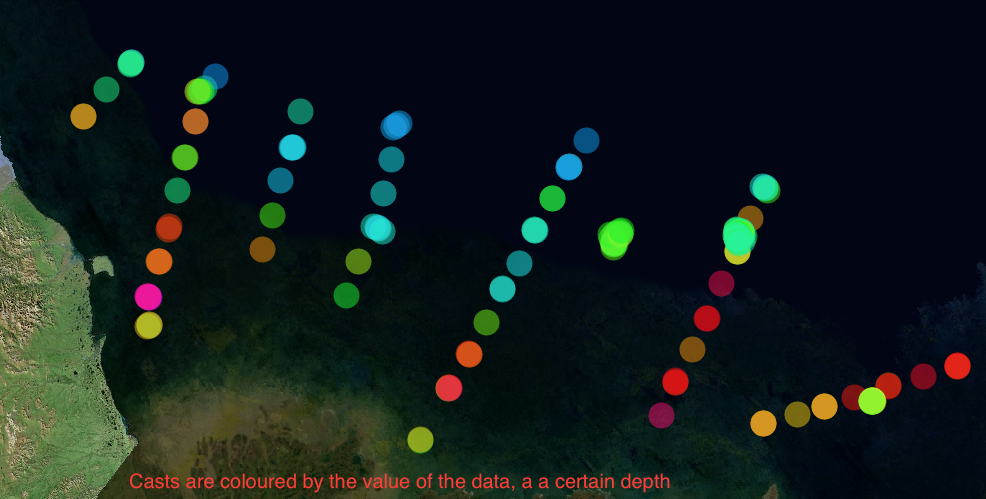
Discovering CTD Data. CTD data will appear on the map as circular blue casts, that represent where data was collected. Data will be collected at single date, recording information at each depth of water column. CTD data can be viewed by clicking on a cast on the map; which will load a popup containing images generated from the data the cast collected.
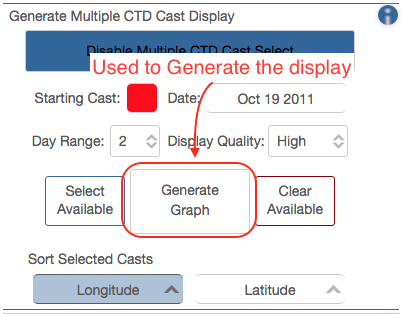
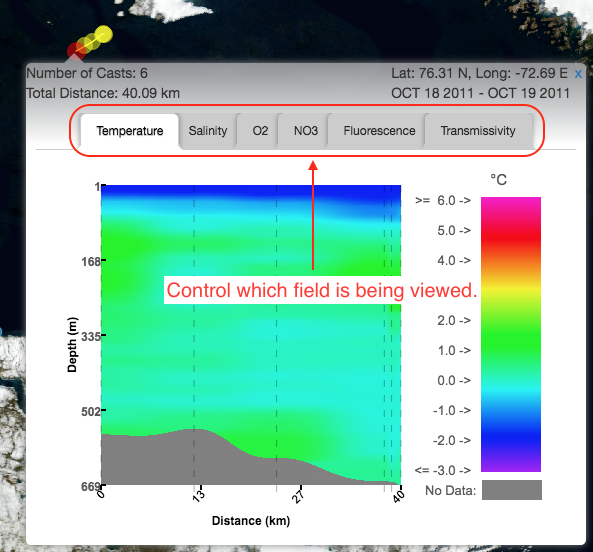
CTD data also has two global visualizations. The first allows you to combine multiple casts and then generate images containing data from all of the casts.
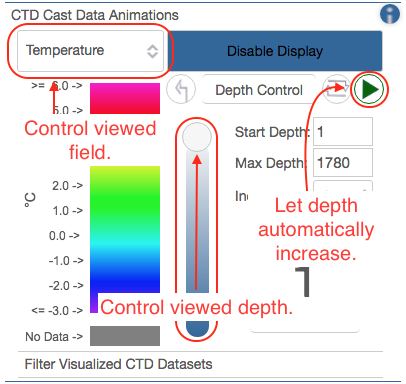
The second allows you view data for each CTD cast at a particular depth.
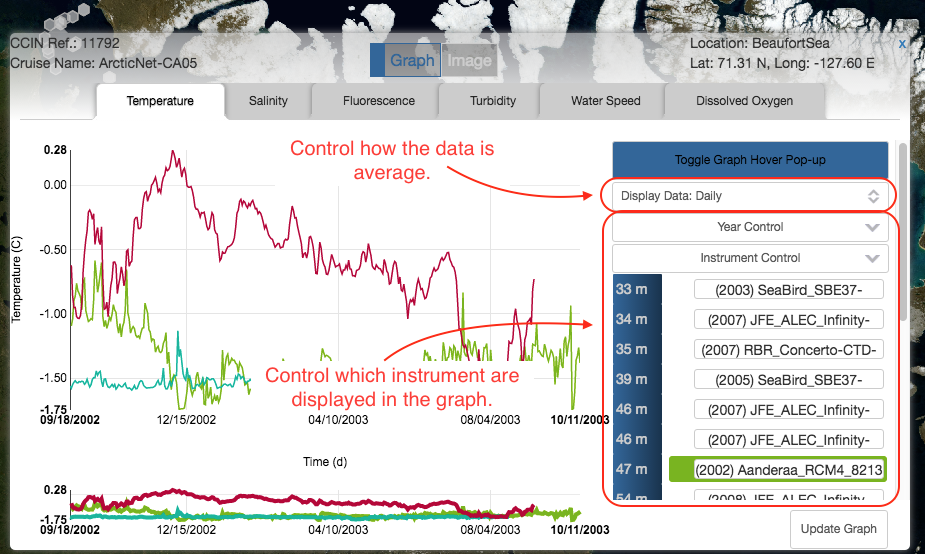
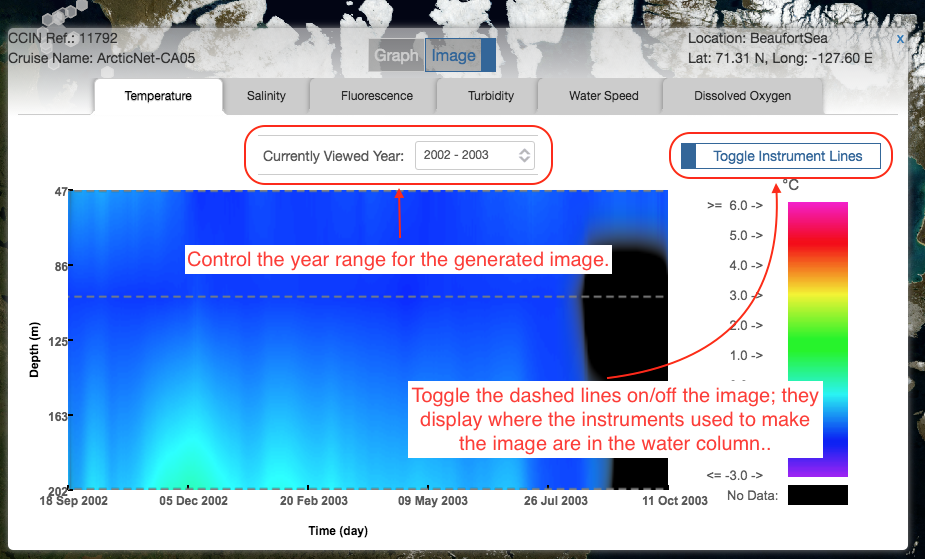
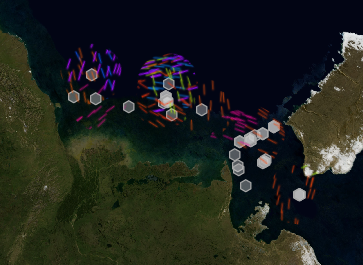
Discovering Mooring Data. Mooring data will appear on the map as hexagonal grey casts, that represent where the data was collected. Mooring data is collected over the span of a year; where multiple different instruments are left at different depth levels in the water column and are collected after a year. To view Mooring Data click on any of the casts on the map. The popup then has two view options: either view the data through a graph, or have an image generated of the data.
Mooring data also has a global visualization feature that allows you to view water current data at a specific date. If a mooring instrument has data available then a certain number of waves will appear on map, displaying the direction and speed of the water. The waves are also coloured by the depth at which the data was taken.

Discovering GIS Data. GIS data is visualized through shape files displayed on the map. Each shape on the map is casts where data was recorded. GIS data can the be viewed by clicking on the data.
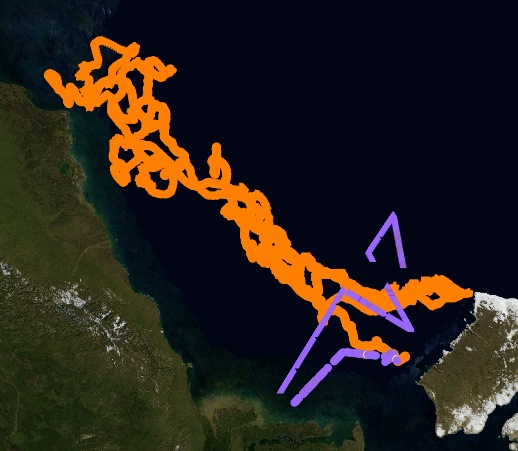
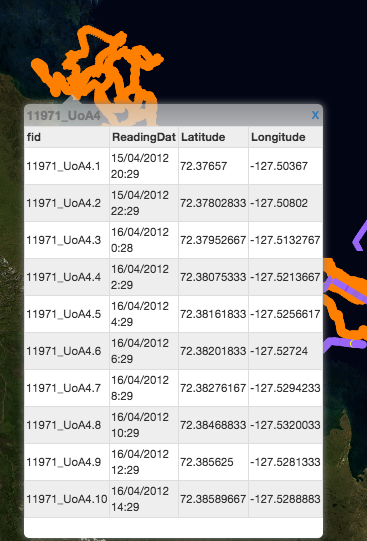
Controlling the Data. Each datasets loaded in the application can be toggled on and off the map, so you are able to control what is being displayed at all times. You also have the ability to view datasets. When viewed, datasets casts will be highlighted on the map and an additional information table will also appear allowing you to toggle every cast.
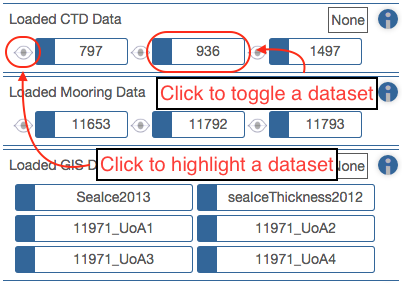
Data can also be controlled through the date range filter. Both CTD and Mooring data casts can be filter off the map using the date slider. The map also contains four additional overlays which can be toggled on/off the map.
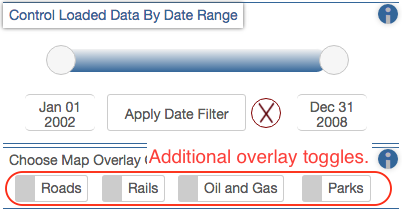
The Map Viewer application also contains many in-app instructions for additional assistance; click on the small information buttons placed throughout the app for help.

Canadian Ice Service Sea Ice Charts
The Canadian Ice Services (CIS) Sea Ice Charts data collection consists of The Canadian Ice Service’s ice-related information from Canadian waters that is being made available through the Polar Data Catalogue for public and research use. Weekly Regional ice charts and Image Analysis charts are currently available in the PDC, and summary information on Ship and Aerial observations is available, soon to be augmented with the corresponding charts.
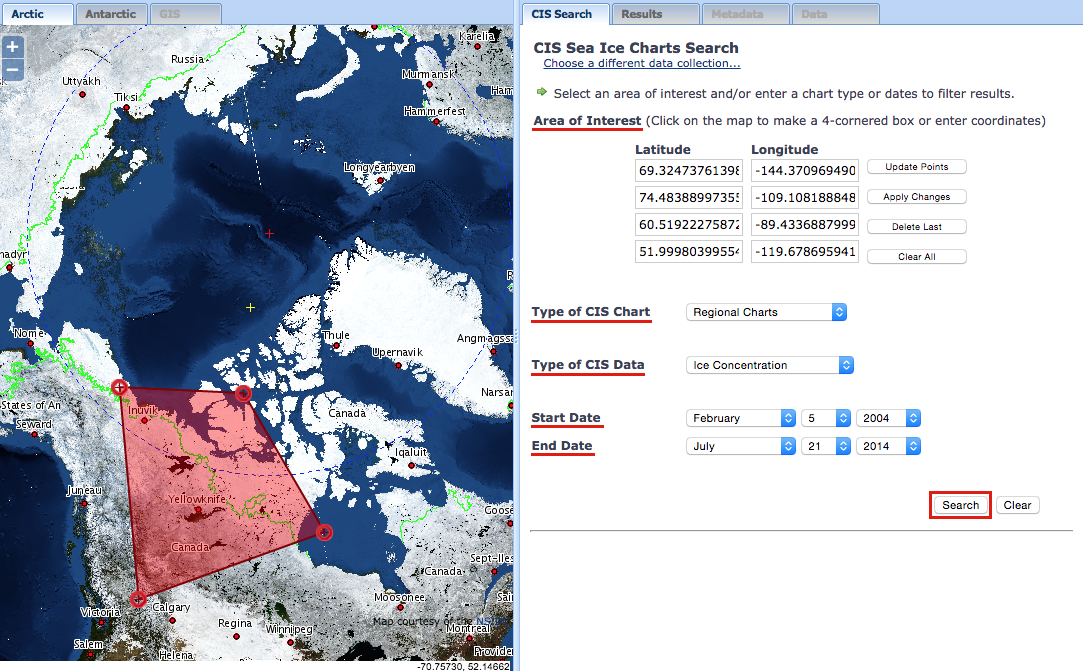
Search for Data
These four search types (Geographic, CIS chart type, CIS data type and Time period) can be combined to further narrow the results.
Click the “Search” button to proceed to the results.
View Search Results
Once you have completed your search, the search results are listed in the right panel under the “Results” tab. The total number of results returned by the search engine is displayed at the bottom right corner of the page. If the search returns more than 25 results, you can use the blue navigation arrows at the bottom of the right panel to go through all of the pages, 25 results at a time. For each record, the results page shows the Title, Start Date, a “Show/Hide” button (to show the study site on the map in the left panel), and Download link if the data can be downloaded directly from the PDC. All results can be sorted by “Ascending” or “Descending” order of the column fields (e.g., sorted alphabetically by Title).
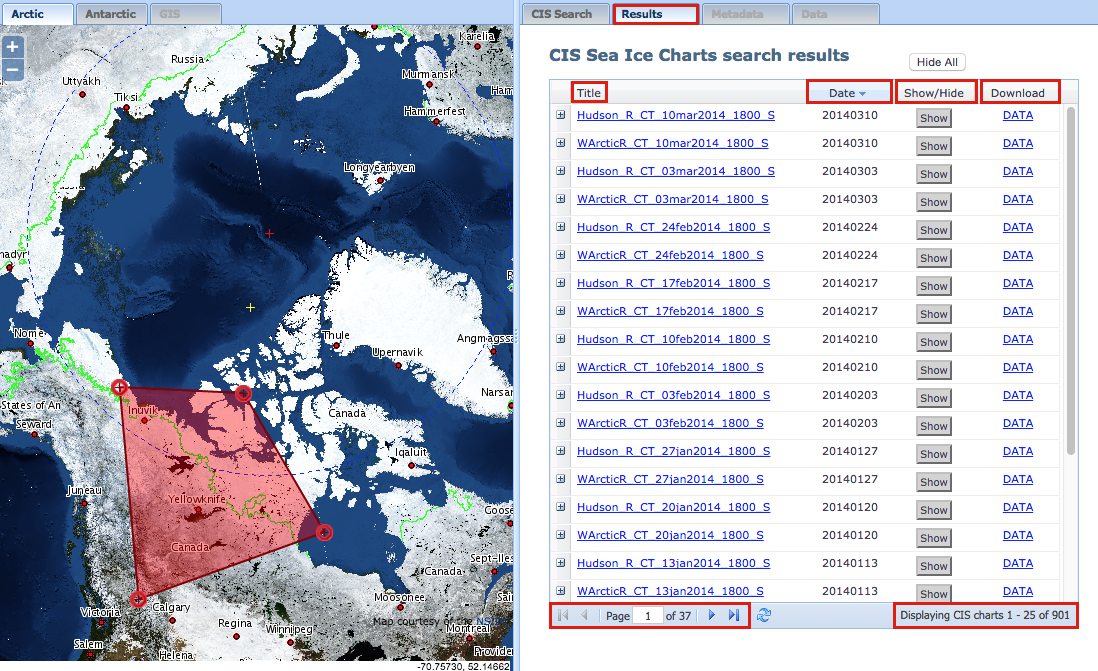
The data coverage boundary box or the specific geographic location of the data record will be shown on the map in the left panel when the “Show/Hide” button is clicked. Clicking “Hide all” will clear all the location information for the data records shown on the map.

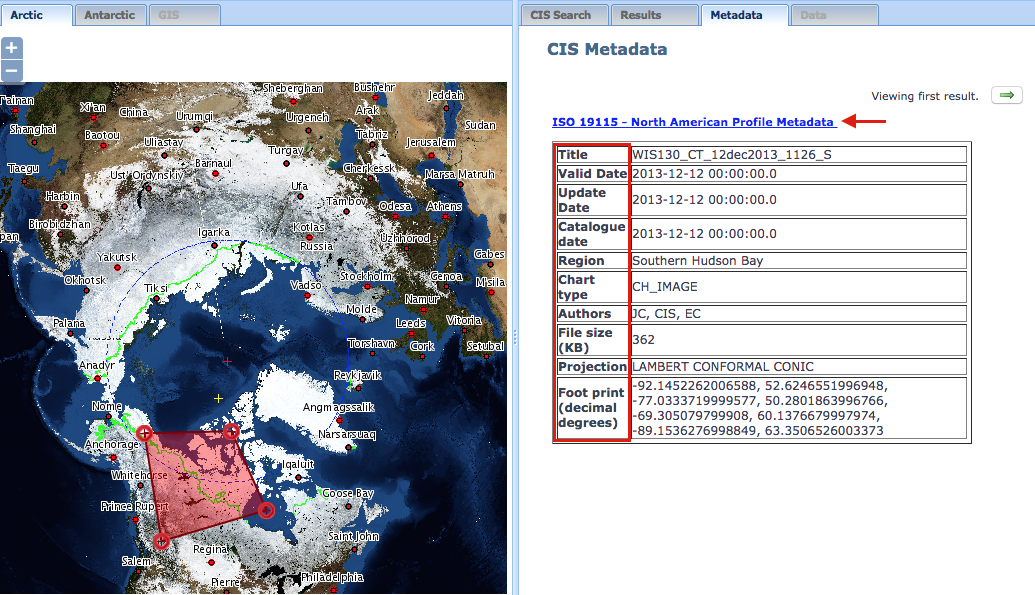
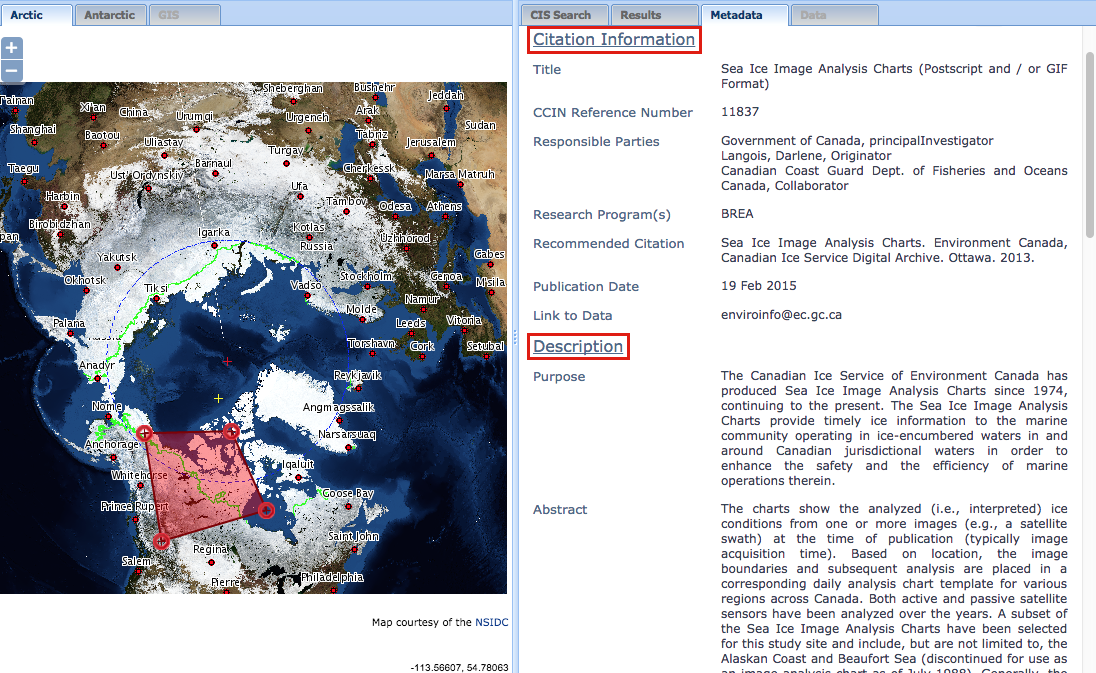
This will provide information about the selected data record, including, but not limited to: Citation information, Description, Temporal Coverage, Spatial Domain, Keywords, Place, Status, Constraints, Point of Contact, and Metadata Reference information.
Download Data
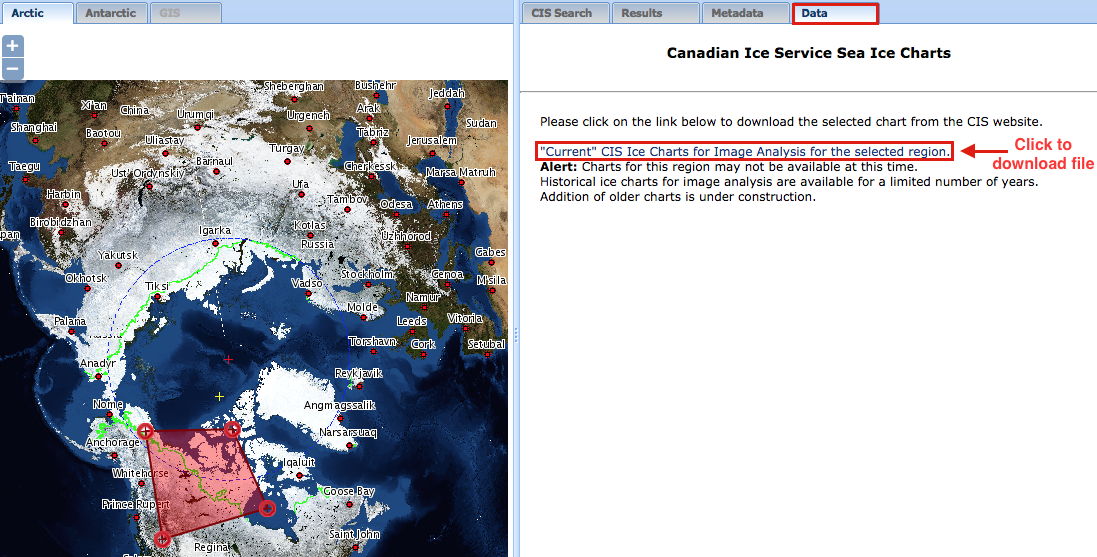
The “Download” column of the results table under the “Results” tab provides information about data availability in the PDC. To download the data that is readily available, click on the “DATA” link and you will be directed to the Data tab. Here, you will be able to click on the link shown below to download the selected chart from the CIS website.
Note: Air and ship observation charts currently do not offer downloadable data, so the “Download” column for these records would have “N/A” listed.
RADARSAT-1 Polar Science Dataset Search
Search for Data
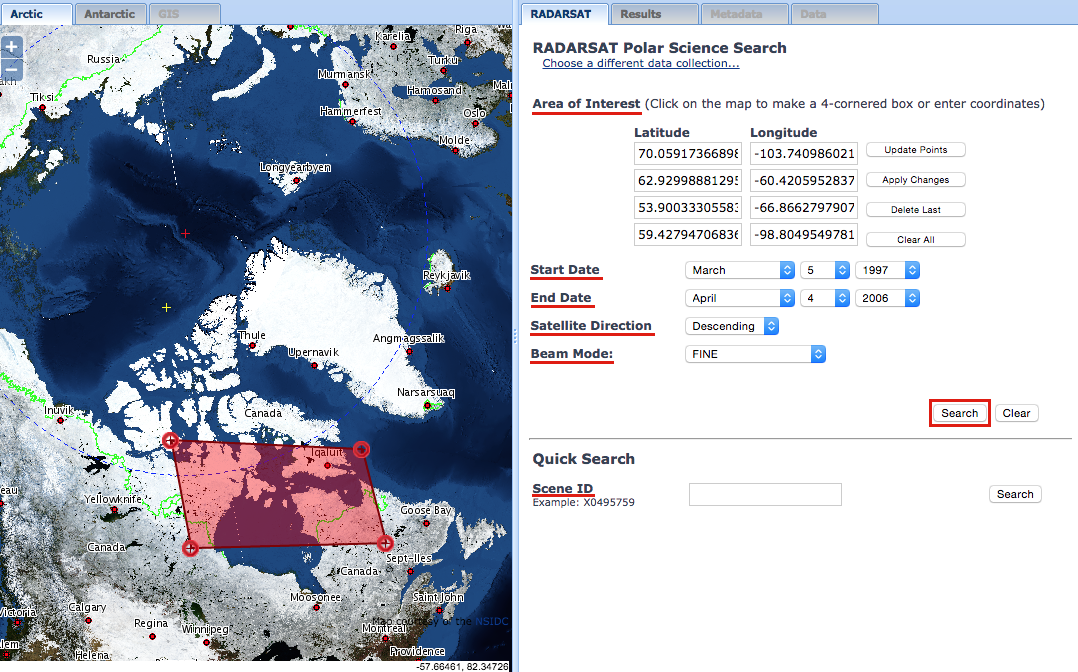
This option enables you to search for RADARSAT (or Earth observation) data of the Arctic. There are multiple fields to search by: including the Spatial location of interest, Time period of interest, Satellite direction, and Beam mode. Detailed definitions of each field can be found on the website of the Canadian Space Agency.
These four search types (Geographic, Satellite Direction, Beam mode, and Time period) can be combined to further narrow the results.
Click the “Search” button to proceed and show the results.
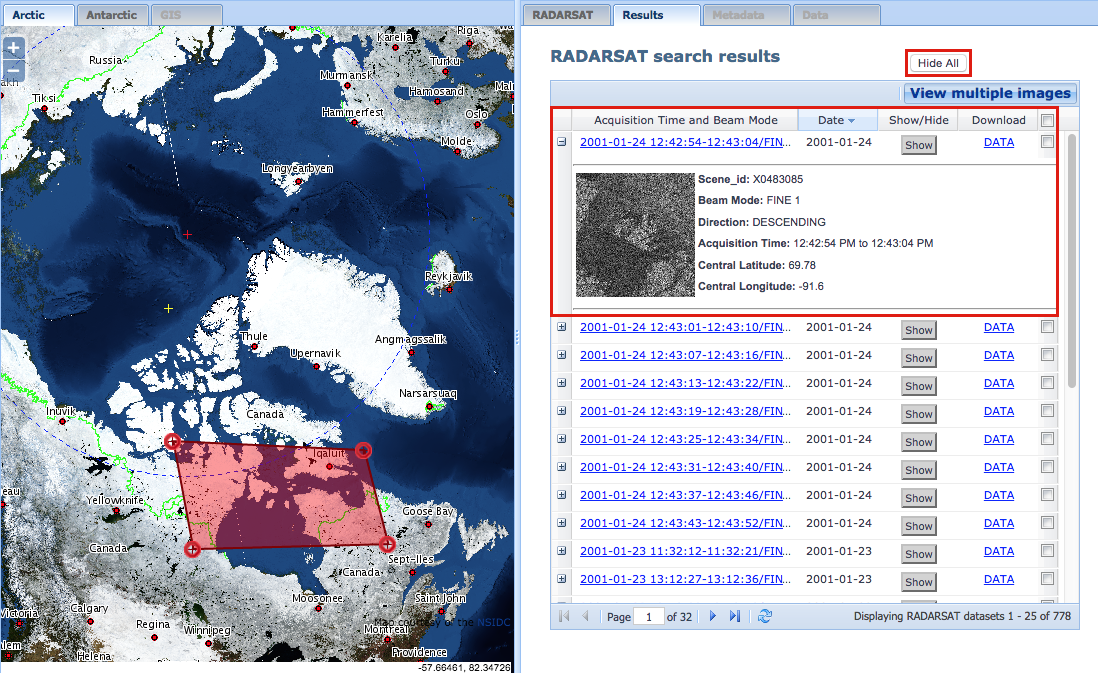
View Search Results
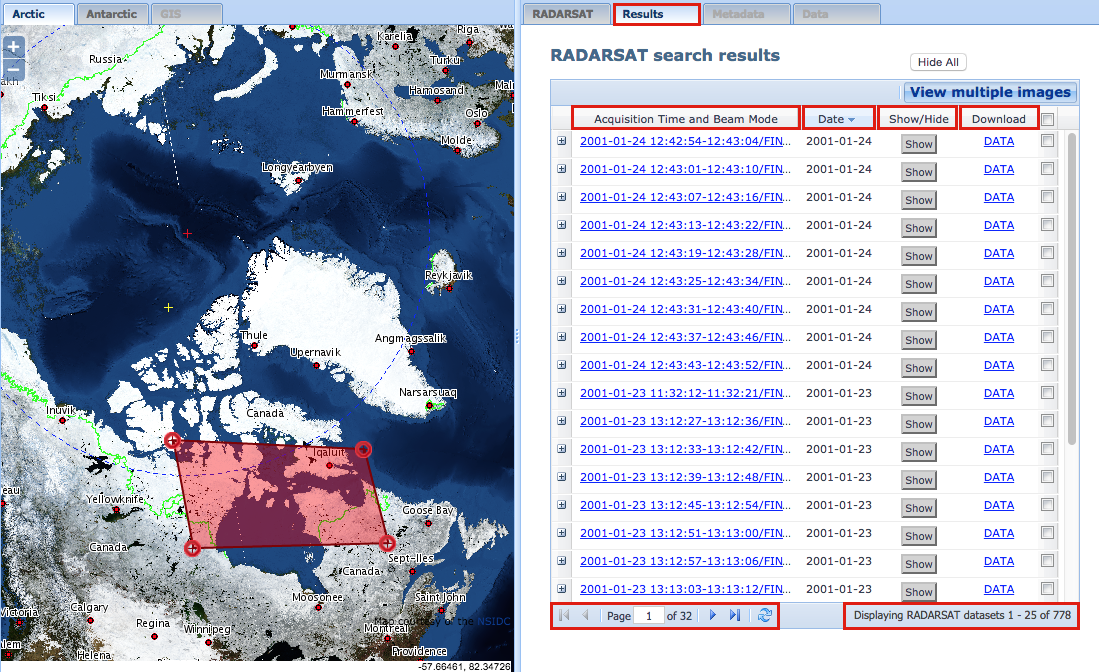
Once you have completed your search, the search results are listed in the right panel under the “Results” tab. The total number of results returned by the search engine is displayed at the bottom right corner of the page. If the search returns more than 25 results, you can use the blue navigation arrows at the bottom of the right panel to go through all of the pages, 25 results at a time. For each record, the results page shows the Image Acquisition Time and Beam Mode, Date, a “Show/Hide” button (to show the study site on the map in the left panel) and the Download link. All results can be sorted by “Ascending” or “Descending” order of the column fields (e.g., sorted chronologically by Date).
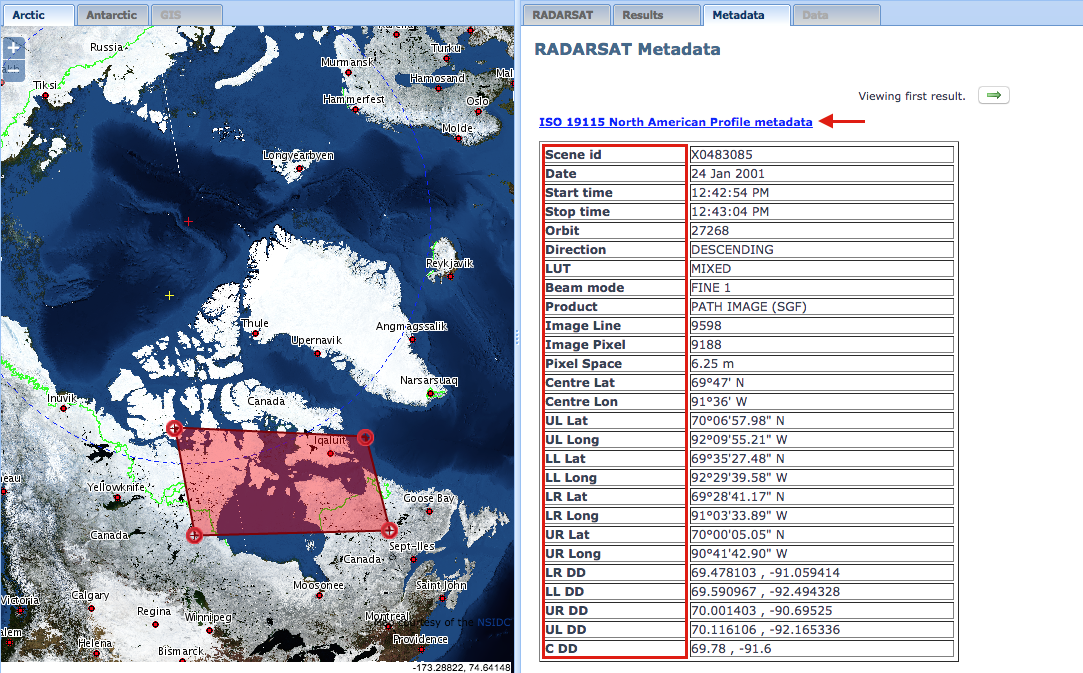
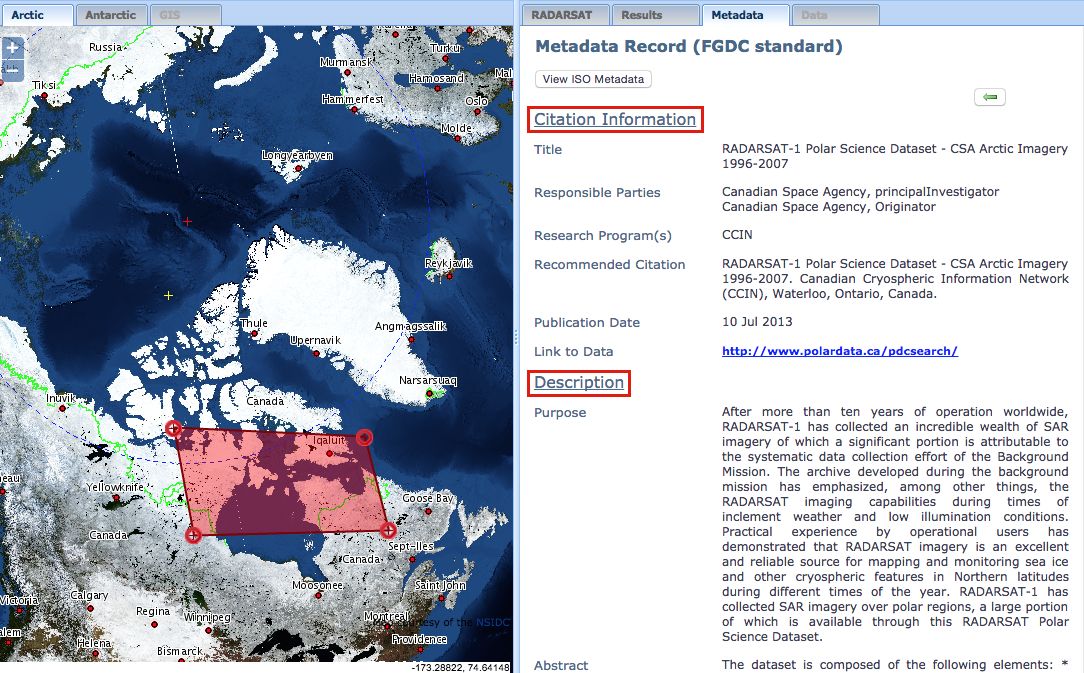
FGDC and ISO Metadata can be viewed to see general information about the RADARSAT-1 data project, including, but not limited to: Citation Information, Description, Temporal Coverage, Spatial Domain, Keywords, Place, Status, Constraints, Point of Contact, and Metadata Reference information.
Download Imagery
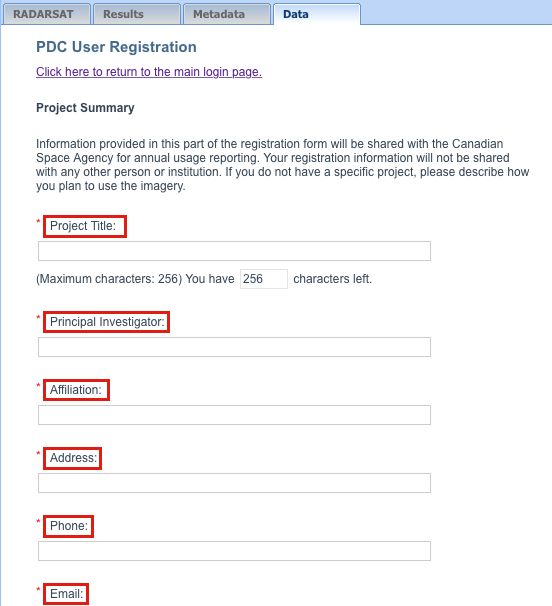
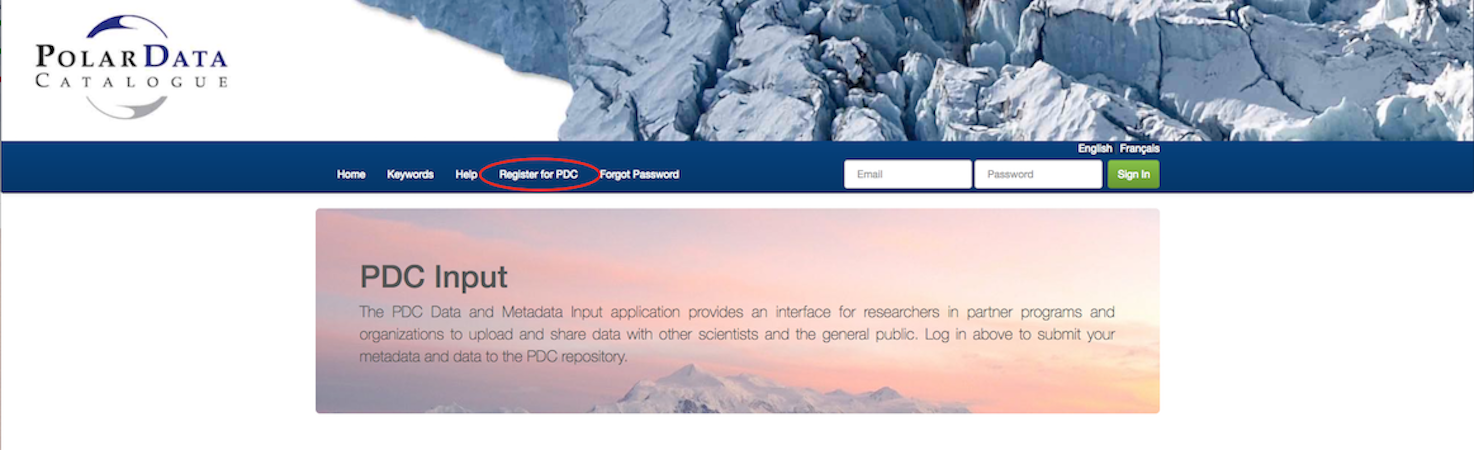
You need to Register and/or Sign in to download RADARSAT data. If you have not registered, click the “Register for PDC” link, as shown below, and complete the registration process.

If you have registered, enter your registered email address and password to sign in. After signing in, you will be directed to the following page, which must be completed to gain access to the data. Information provided in this section will be shared with the Canadian Space Agency alone, for the purpose of determining annual usage. The fields with red asterisks beside them are mandatory to fill.
If all the fields are filled appropriately, you will be taken to the page shown below. Click on the link to return to the main login page. After logging in, you should be able to download the RADARSAT imagery by clicking on “Download individual image(s).” Processing may take up to 2 minutes, depending on the file size(s).

Then, click on the link to download your image.

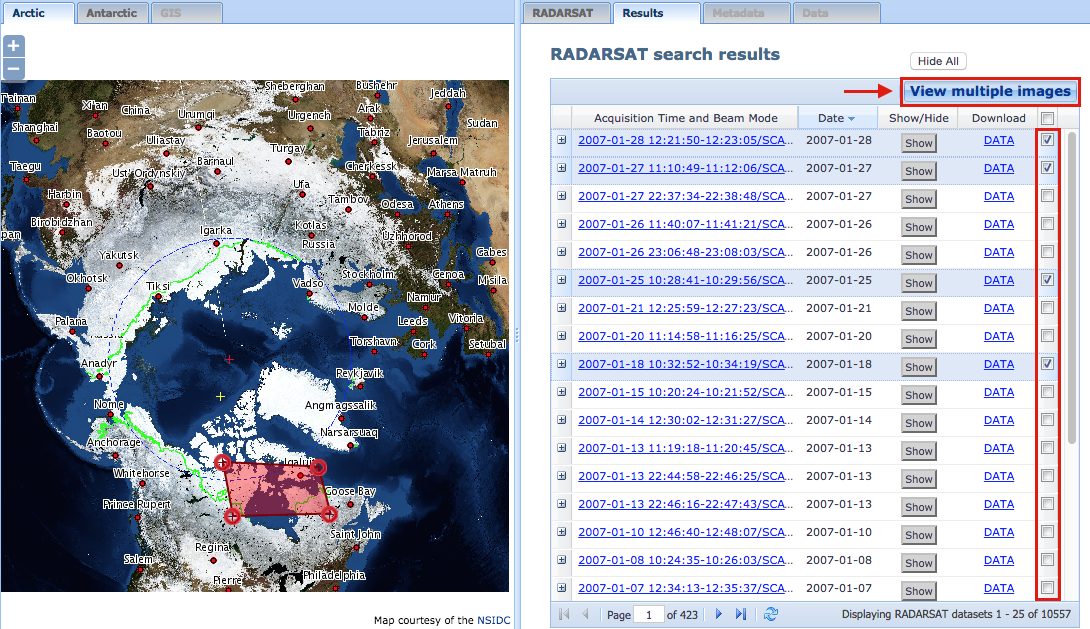
The RADARSAT search tool also allows users to view multiple RADARSAT images at once. After selecting search fields, you will be taken to the “Results” tab. Select the boxes beside the “Download” column for the images you wish to view. Then, click the “View multiple images” button at the top right of the “Results” page.
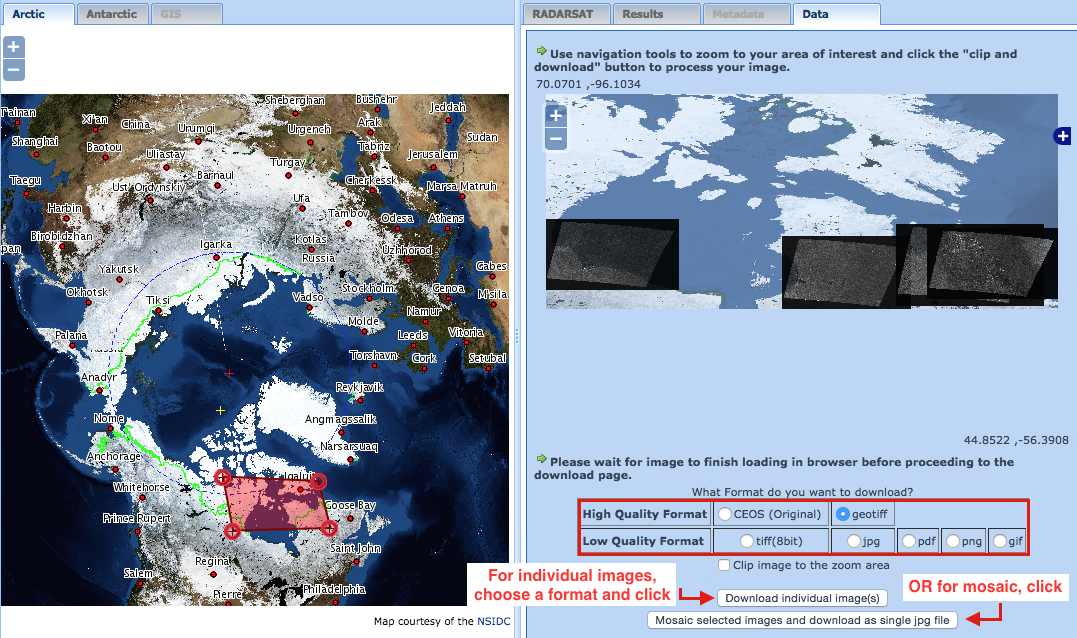
The selected images will open in the “Data” tab. You then have the option to download individual images or a mosaic of multiple images. In order to do so, you must be a registered user of the PDC and have also completed your PDC user registration form for the Canadian Space Agency. Once you have completed these steps, you can proceed to download RADARSAT images in several high or low quality formats. Mosaic images only support JPEG format.
Choose your preferred image format and click the “Download individual image(s)” button to download individual images. Or, select the JPEG format and click the “Mosaic selected images and download as single jpg file” button to download multiple images in one file.
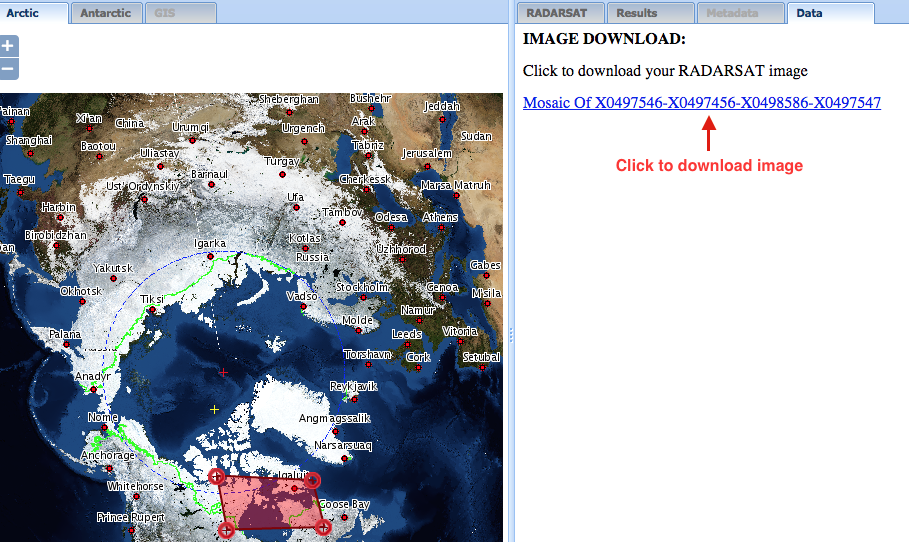
Confirm your image selection by clicking the link to begin downloading your RADARSAT images.
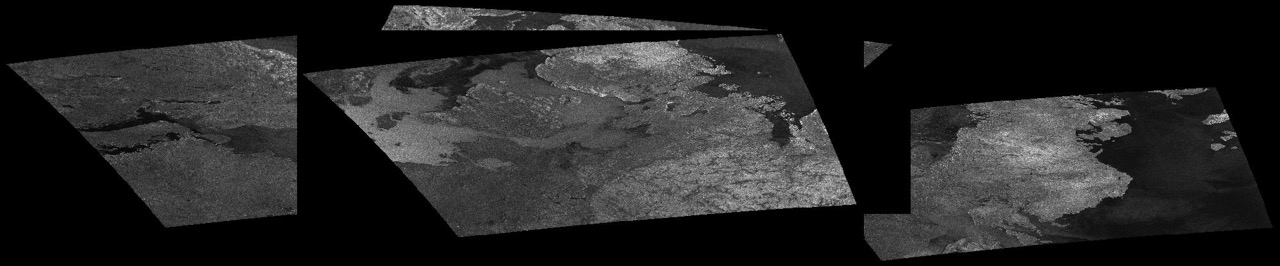
An example of a RADARSAT mosaic image is provided below.
RADARSAT-2 Mosaics of Antarctica Search
Search for Data
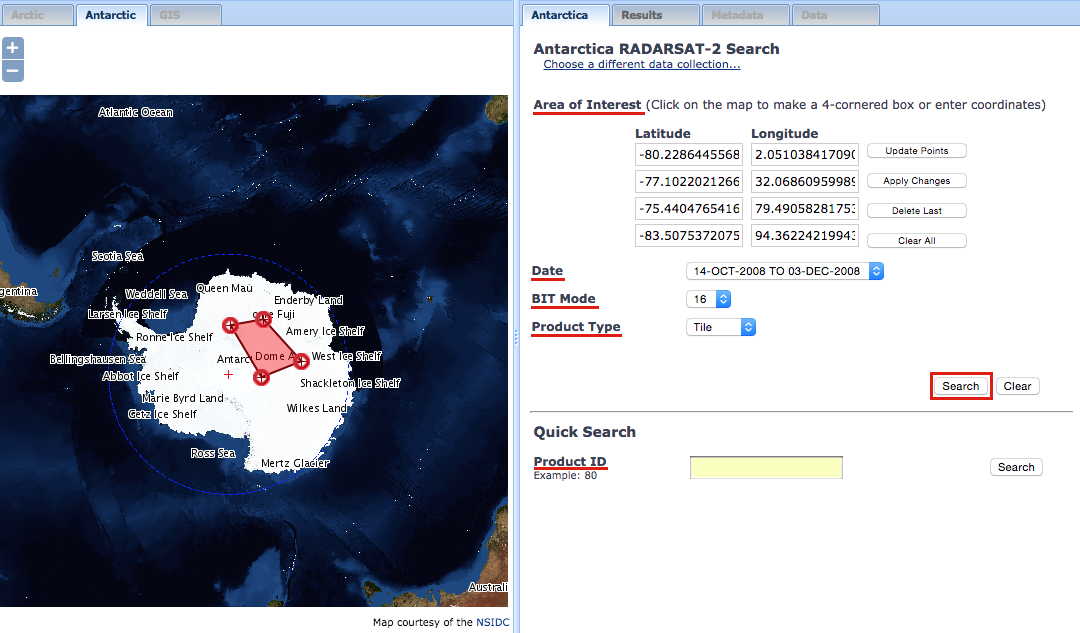
This option enables you to search for RADARSAT (or Earth observation) data of the Antarctic. There are multiple fields to search by: including the Spatial Location of interest, Time Period of interest, BIT Mode, and Product Type. Detailed definitions of each field can be found on the website of the Canadian Space Agency.
These four search types (Geographic, BIT Mode, Product Type and Time Period) can be combined to further narrow the results.
Click the “Search” button to proceed and show the results.
View Search Results
Once you have completed your search, the search results are listed in the right panel under the “Results” tab. The total number of results returned by the search engine is displayed at the bottom right corner of the page. If the search returns more than 25 results, you can use the blue navigation arrows at the bottom of the right panel to go through all of the pages, 25 results at a time. For each record, the results page shows the Product Name, Start Date, a “Show/Hide” button (to show the study site on the map in the left panel) and Download link. All results can be sorted by “Ascending” or “Descending” order of the column fields (e.g., sorted chronologically by Start Date).
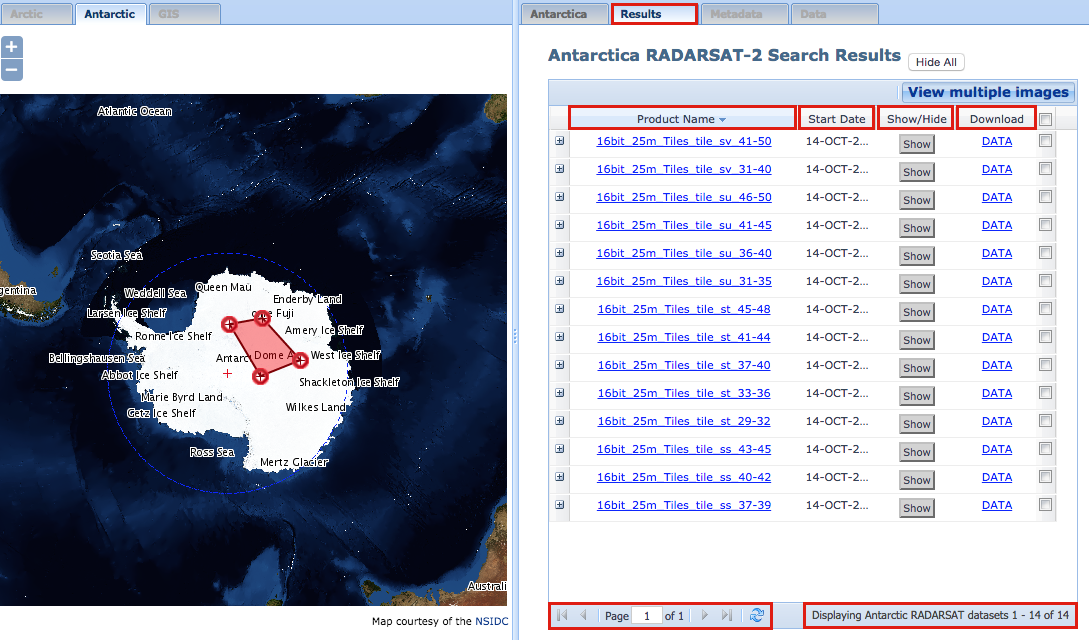
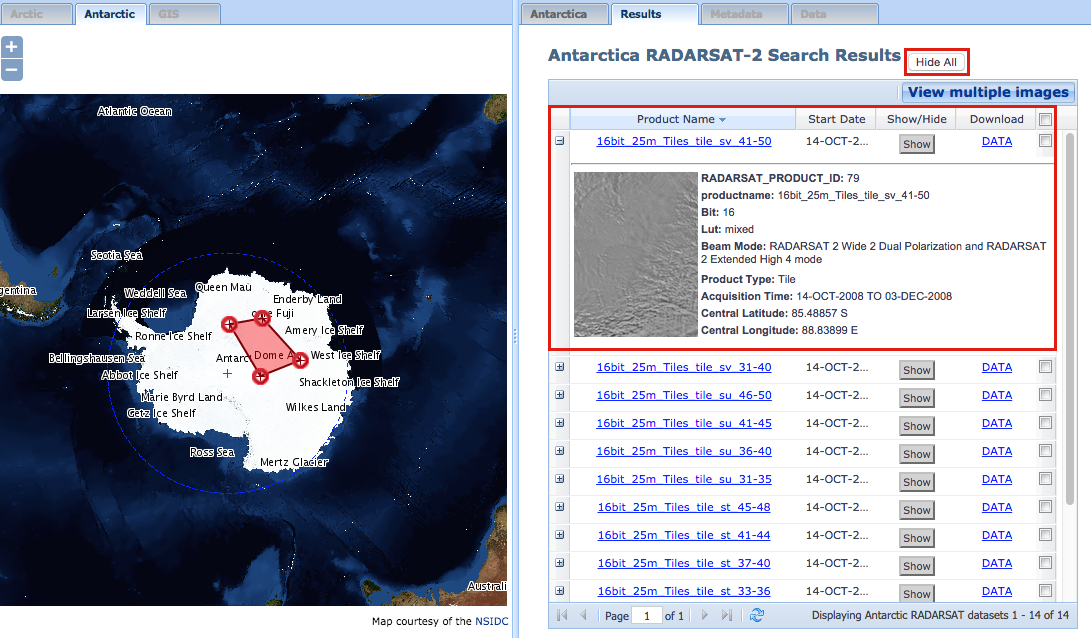
The Show/Hide button will show the central Latitude and Longitude of the current record on the map in the left panel.

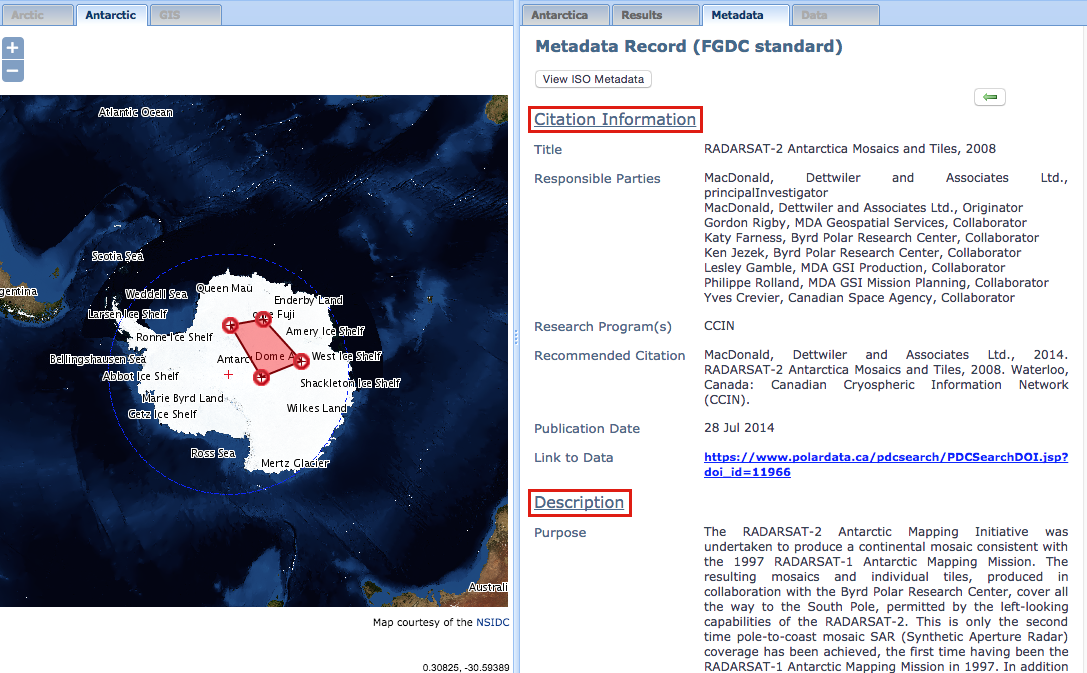
FGDC and ISO Metadata can be viewed to see general information about the RADARSAT-2 data project, including, but not limited to: Citation Information, Description, Temporal Coverage, Spatial Domain, Keywords, Place, Status, Constraints, Point of Contact, and Metadata Reference information.
Download Imagery
You need to Register and/or Sign in to download RADARSAT data. If you have not registered, click the “Register for PDC” link, as shown below, and complete the registration process.
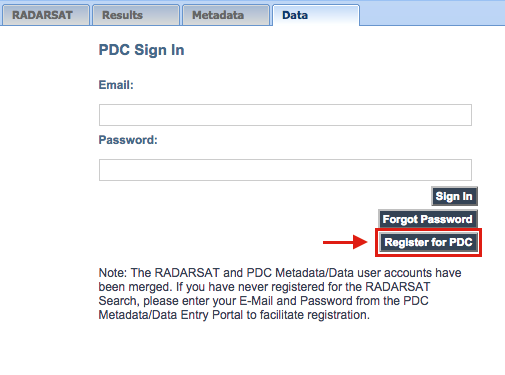
If you have registered, enter your registered email address and password to sign in. After signing in, you will be directed to the following page, which must be completed to gain access to the data. Information provided in this section will be shared with the Canadian Space Agency alone, for the purpose of determining annual usage. The fields with red asterisks beside them are mandatory to fill in.

If all the fields are filled appropriately, you will be taken to the page shown below. Click on the link to return to the main login page.
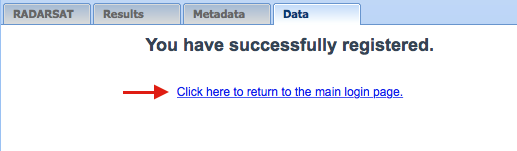
After logging in, you should be able to download the RADARSAT imagery by clicking on the File name.
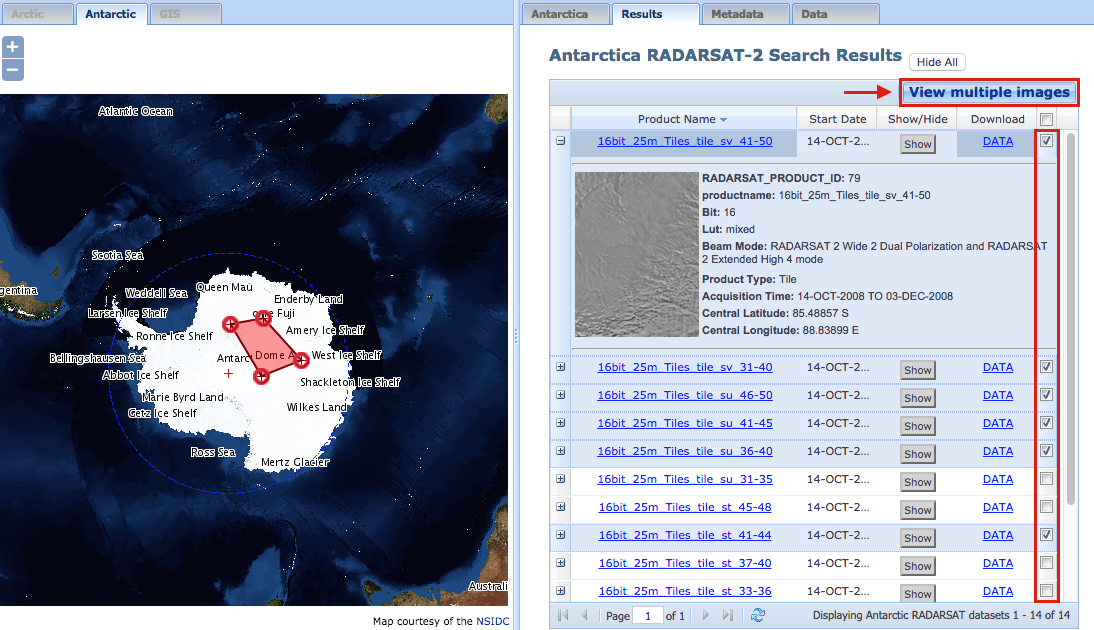
The RADARSAT search tool also allows users to view multiple RADARSAT images at once. After selecting search fields, you will be taken to the “Results” tab. Select the boxes beside the “Download” column for the images you wish to view. Then, click the “View multiple images” button at the top right of the “Results” page.
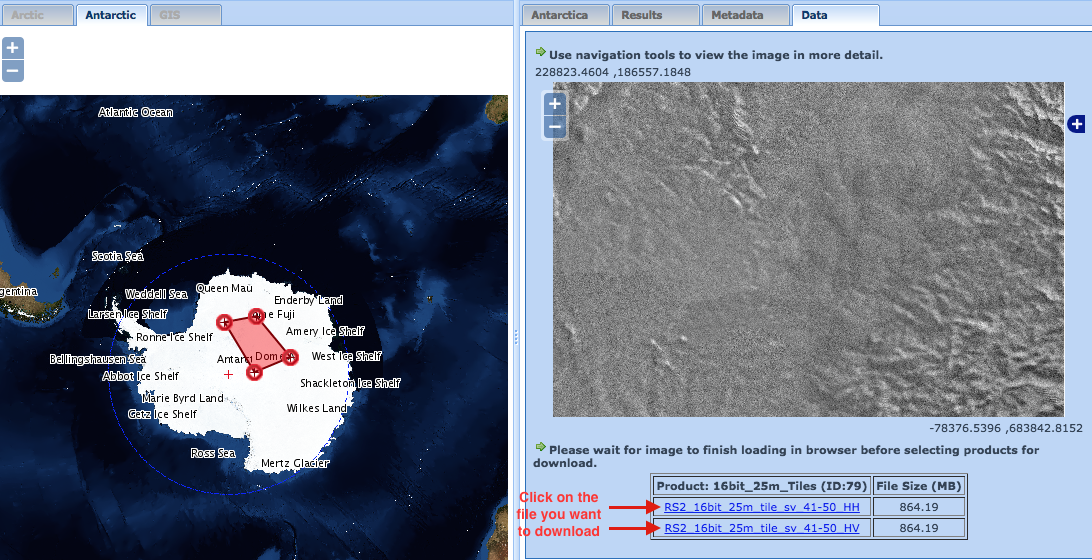
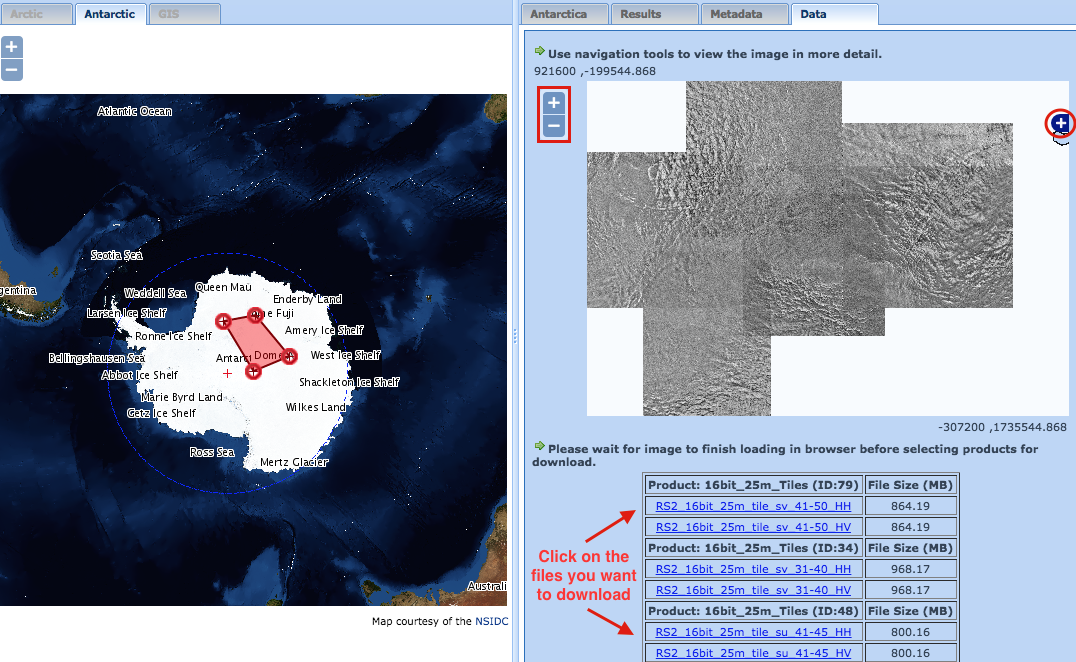
The selected images will open in the “Data” tab. You then have the option to download the individual images. In order to do so, you must be a registered user of the PDC and have also completed your PDC user registration form for the Canadian Space Agency. Once you have completed these steps, you can proceed to download RADARSAT images. You may use the zoom tools to view the images in more detail, or click on the “+” button in the top right corner to remove or add layers. Click on the RADARSAT-2 image files that you would like to download.
PDC Low-Bandwidth Search (Lite)
The PDC has a low-bandwidth search feature, which is ideal for users operating with a limited Internet connection.
This search interface can also be accessed from PDC Input Home page or via the "Submit Data" button on the PDC Welcome page.
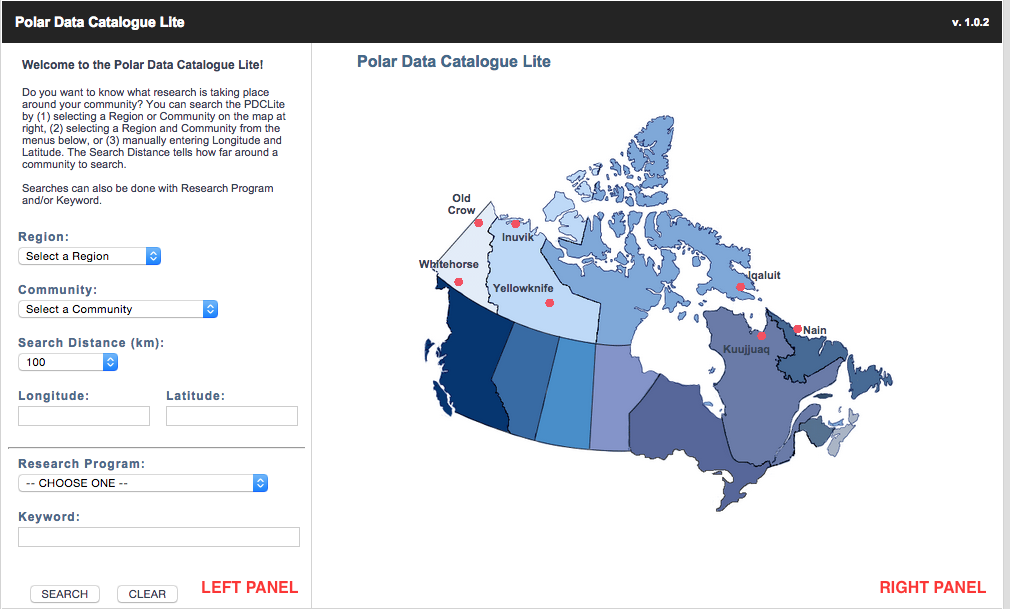
The PDC Lite page will look like this:
Search for Data
There are multiple fields to search by, including: Location (including Search Distance), Research Program, or Keyword. The user can select just one field or a combination of multiple fields to search by.
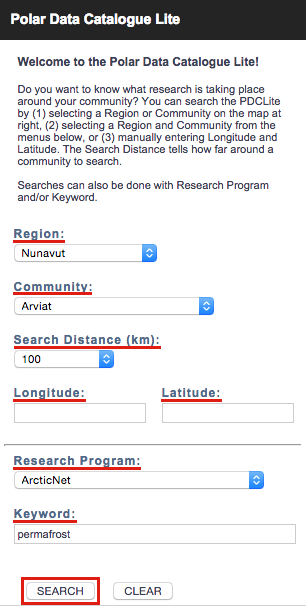
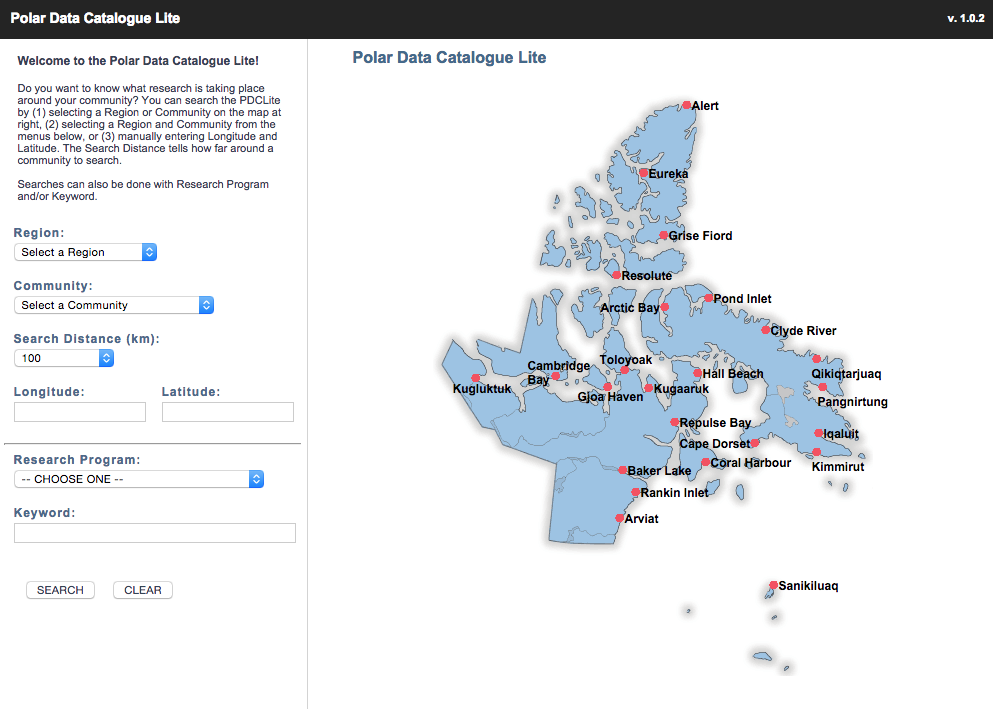
You can also choose a location to limit your search through the fields in the left panel. You can either select a Region and Community, or you can you can manually enter a longitude and latitude coordinate. Using the “Search Distance” field allows you to specify the radius in which to search around the selected community. If you want to see results closer to your community, choose smaller distances (down to 10 km). If you want to see results further from your community, choose larger distances (up to 500 km).
These three search types (Geographic, Research Program, and Keyword) can be combined to further narrow the results. Click the “Search” button to proceed to the results.
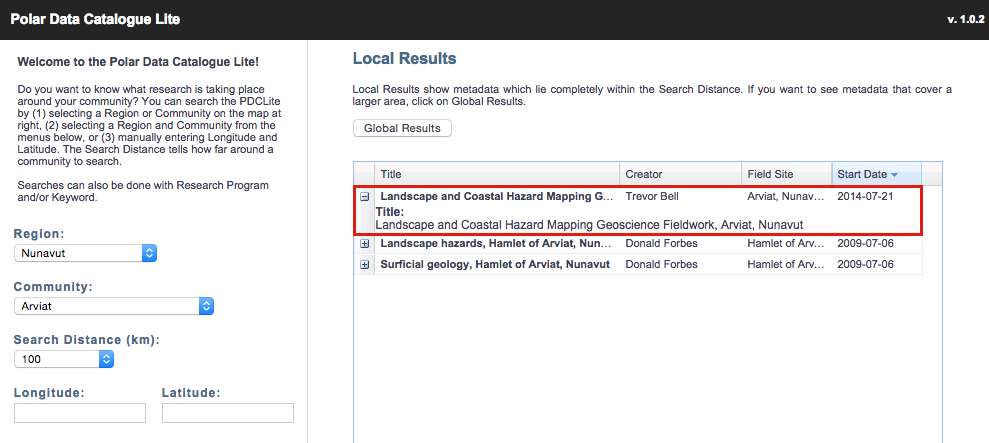
View Search Results
Once you have completed your search, the search results are listed in the right panel. The total number of results returned by the search engine is displayed at the bottom right corner of the page. If the search returns more than 25 results, you can use the blue navigation arrows at the bottom of the right panel to go through all of the pages, 25 results at a time. For each record, the results page shows the Title, Creator, Field Site, and Start Date. You may also click the “Global Results” button to obtain search results from a larger geographic area. All results can be sorted by “Ascending” or “Descending” order of the column fields (eg.., sorted alphabetically by Title).

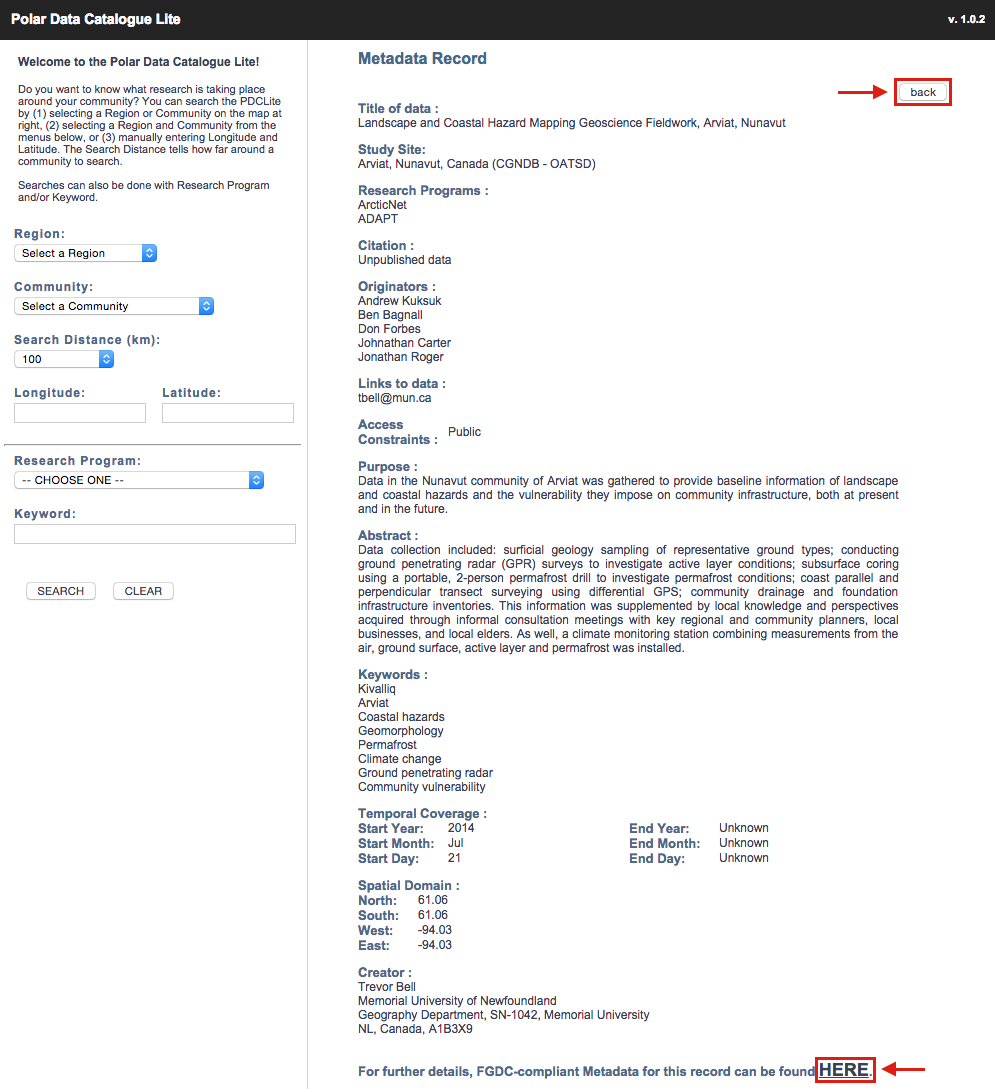
If you would like to go back to the Results page, click on the “back” button in the top right corner. If more details about the metadata or data of the project are wanted, there is a link at the bottom of each metadata page that directs to the ISO 19115 or FGDC-Standard Metadata in the PDC Search Tool.
Metadata Explorer
¶The Polar Data Catalogue Explorer (or PDC Explorer) is an interactive data visualization that is designed to to make discovering and using data in the Polar Data Catalogue easy and effective. The goal is for the map to align with FAIR principles (Findable, Accessible, Interoperable, and Reusable) while also enhancing data discoverability.
User Interface Guide
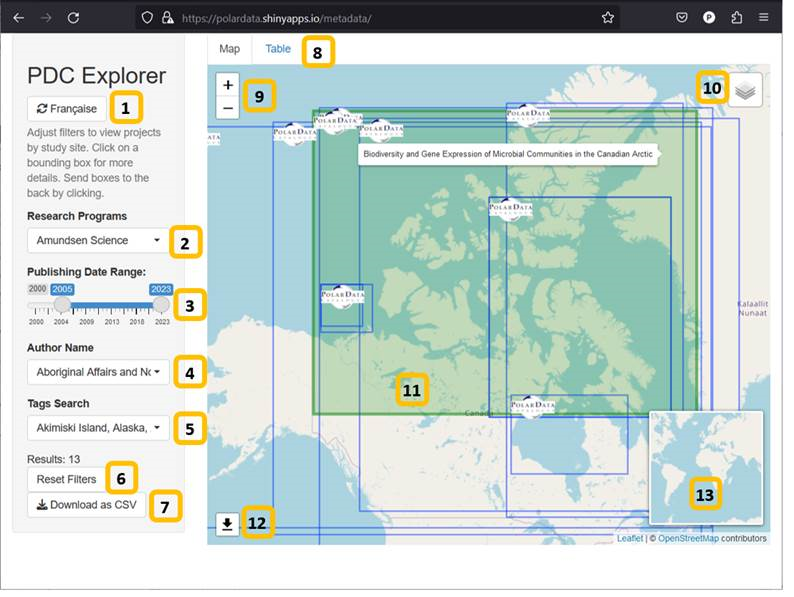
1. Language switcher button – click this button to switch the display language from English to French and back.
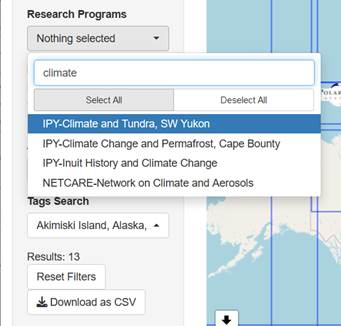
2. Research program filter – click this filter to add or remove programs by name from the map. By default a single program (Amundsen Science) is shown.
3. Publishing date range filter – drag the left marker to set the beginning year of the filter and drag the right marker to the ending year of the filter.
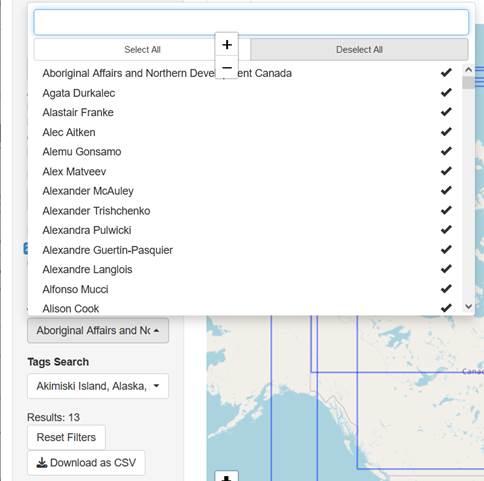
4. Author name filter – click this filter to add or remove authors from the map. By default, all authors are selected.
5. Tags search – click this filter to add or remove tags from the map. By default, all tags are selected.
6. Reset filters button – click this button to reset the filters to default. This is helpful if you aren’t certain which filters are set or if your desired research program is missing.
7. Download as CSV button – click this button to download the raw metadata currently selected by the filters as a comma separated variables file.
8. Map and Table tabs – click these tabs to switch from map to the table view.
9. Zoom buttons – click these buttons to manually zoom in or out of the map. On a desktop, you can also zoom with a scroll wheel on a mouse or touchpad gesture. On mobile, you can zoom with a pinch gesture.
10. Layers selector – click this item to choose map tiles, which changes the colour or content of the underlying map.
11. Program highlight – when your mouse or finger hovers over a research program rectangle, it turns green and you will see the title of that research program appear. If you click on a green rectangle, a popup with detailed information about the research program appears. This also sends the rectangle to the back of the display, which can be helpful if you want to click on a program that is covered.
12. Map download button – click this button to download a screenshot of the current map view
13. Minimap – drag the bounding box around the minimap to change the map view. It is also helpful to understand your zoom level.
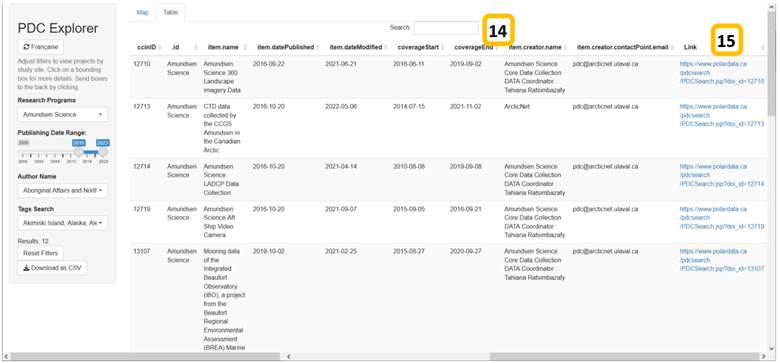
14. Table View: Search – allows you to further filter results by text. It will match any of the columns, allowing you to quickly narrow down results in the table. This filter only works in Table view, and will not affect the map.
15. Table View: Link column – the links in this column allow you to open a new browser tab on the Polar Data Catalogue website, where you can download source data.
Metadata Explorer FAQ's
¶How do I search by program name?
Click on the research program filter. To search, click in the text box at the top of the filter and type in your search term. Click each result to add it to the map. If you have extra programs in your results that you want to remove, clear the text box then click the “Deselect All” option to clear all the programs. Then type your search term again. Note that if the program name in the filter dropdown doesn’t have a check mark on it, it will not show in the map.
How do I search by author name or by tags?
Both the author filter and the tags filter have all items selected by default, and also when the “Reset Filters” button is pressed. To search on author or tags, it might be best to ensure all research programs are also selected. To do this, click on the research program filter and click the “Select All” button. Then you can filter by author name or by tags. You may wish to click “Deselect All” in the author or tags filter, to ensure that you’re only filtering by the author or tags you’re interested in.
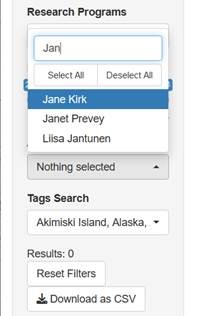
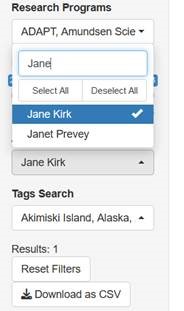
Example Step 1: click “Deselect All” to clear the author filter before searching.
Example Step 2: Search author by name. Note that the Results are 0 unless an author name is clicked on.
How do I download data from the research programs?
Currently, data is only available on the Polar Data Catalogue website, so it can’t be downloaded directly from the PDC Explorer visualization. However, the Explorer has direct links to the PDC website for every research program. There are two main ways to locate these links, popups on the map and the table view.
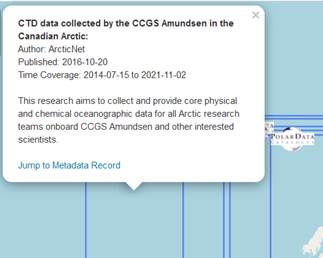
On the map, if you click on any research program rectangle, a popup appears with information about that research program. At the bottom of the popup is a link to the metadata record on the Polar Data Catalogue website where, if it is available, data can be downloaded.
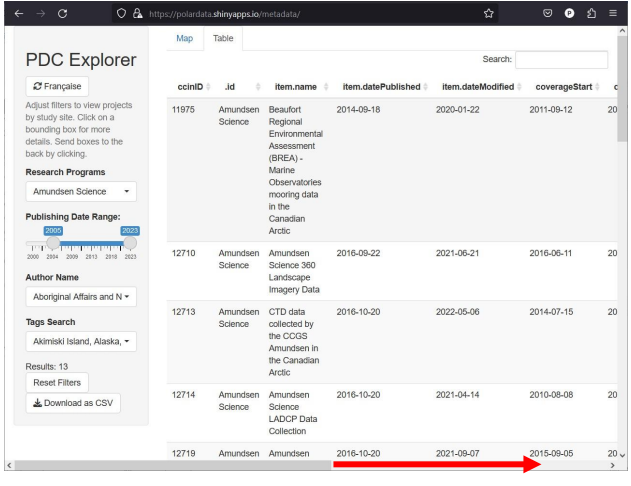
On the table, links to each metadata record are found on the far right side of the table. Depending on your device, you may need to scroll the screen to the far right to see these links.
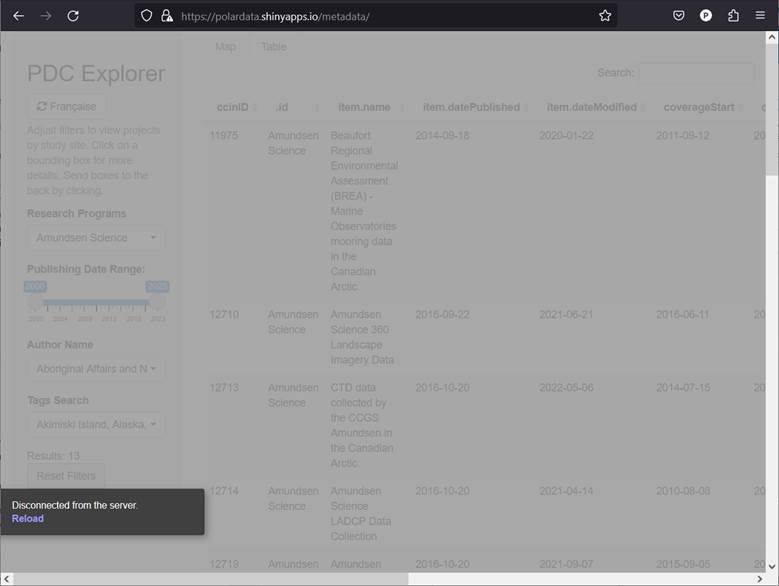
Why is the PDC Explorer screen greyed out?
If the visualization sits idle for long enough, it will disconnect and show a grey screen. You can click on the “Reload” link or refresh your browser to reconnect to the web application. Your filter may reset, so be sure to save any results before halting use of the visualization.
PDC Metadata API
Overview
The PDC Metadata Application Programming Interface (API) is an online resource that provides access to PDC metadata records. This service is implemented as a collection of URL endpoints that can be invoked using HTTP, in order to receive a response. In general, this service is analogous to a query system where API requests (i.e. queries) are made and corresponding responses (i.e. results) are returned. In particular, any given response is a representation of zero or more structured metadata records.
Metadata Structure
Currently, this API provides both XML and JSON responses. The XML is compliant with ISO 19115 standards and the contents are equivalent to the XML that can be extracted from the Geospatial Search tool.
PDC Metadata API Getting Started. This document will describe how to use the metadata API, in order to support activities such as ad hoc queries, automated metadata harvesting, programmatic data mining, and data visualization development.
PDC JSON responses provide schema.org compliant JSON-LD. As a result, the contents will be structured and nested to represent a Dataset, where a Dataset element corresponds to a PDC metadata record. If a response contains one or more metadata records, then each individual Dataset element will be contained within a wrapping itemListElement, where the set of itemListElements are contained within an itemList (i.e. an array of itemListElements). Therefore, it is necessary to understand the structure of the metadata within the API response, in order to be able to effectively extract content of interest (see PDC Metadata API section Consuming API Responses).For further help and troubleshooting, please refer to PDC Metadata API Troubleshooting/Common Errors.
If you have any questions or concerns, please contact PDC Support: pdc@uwaterloo.ca
CCADI Metadata API
Overview
Founded in 2015, the Canadian Consortium for Arctic Data Interoperability (CCADI) is a collaboration among Canadian Arctic data centres with the common goal of providing ethically open, accessible, and comprehensive digital resources to the broadest possible audience of data users. For further information please visit the CCADI website CCADI.org
The CCADI Metadata Application Programming Interface (API) is an online resource that provides access to publicly available CCADI metadata records from various CCADI partner organizations. This service is implemented as a collection of URL endpoints that can be invoked using HTTP, in order to receive a response. In general, this service is analogous to a query system where API requests (i.e. queries) are made and corresponding responses (i.e. results) are returned. In particular, any given response is a representation of zero or more structured metadata records.
For help, troubleshooting, and technical specs, please refer to the CCADI Metadata API Cookbook.
Part II: Frequently Asked Questions
User Interface
How do I change my login information?
You will then be able to edit your profile by selecting “Edit” or change your password by selecting “Change Password.” You have access to change every field, except for your email address (due to security reasons).
If your PDC account is registered with an email address that you no longer have access to, or will no longer have access to, contact pdc@uwaterloo.ca, please do not create a new account with a new email address.
What if I forgot my password?
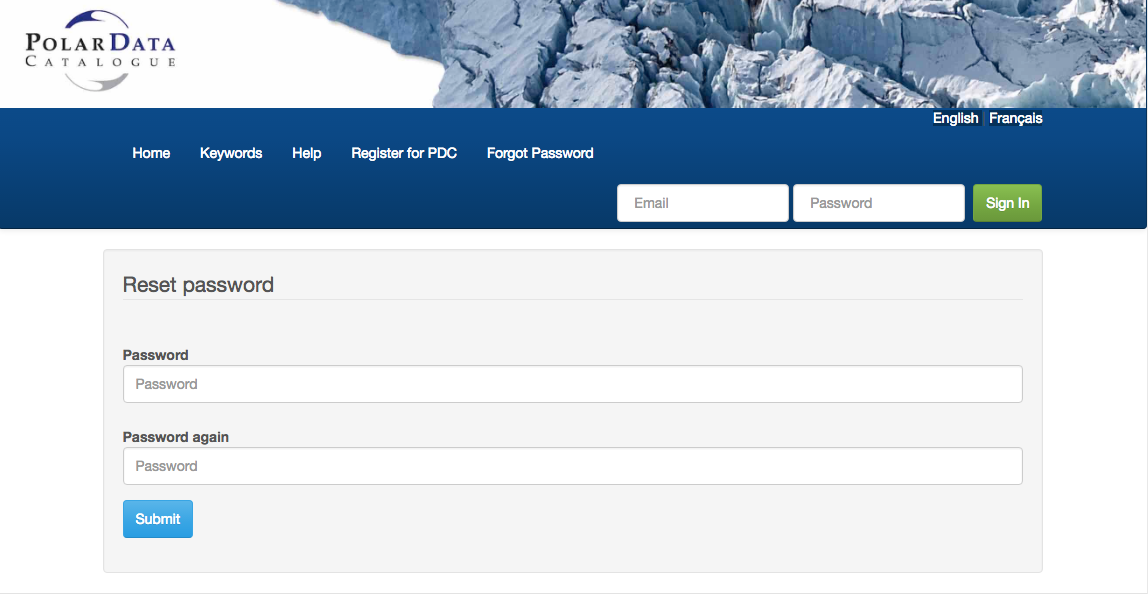
On the home page of the PDC input, click the “Forgot Password” next to the sign in fields. Enter your email address, and you will receive an email with a new temporary password link to reset your password.
Enter your new password in the “Password” and “Password again” fields and click “Submit.” You will be directed to the PDC input page. Verify that your new password allows you to log in to your account.
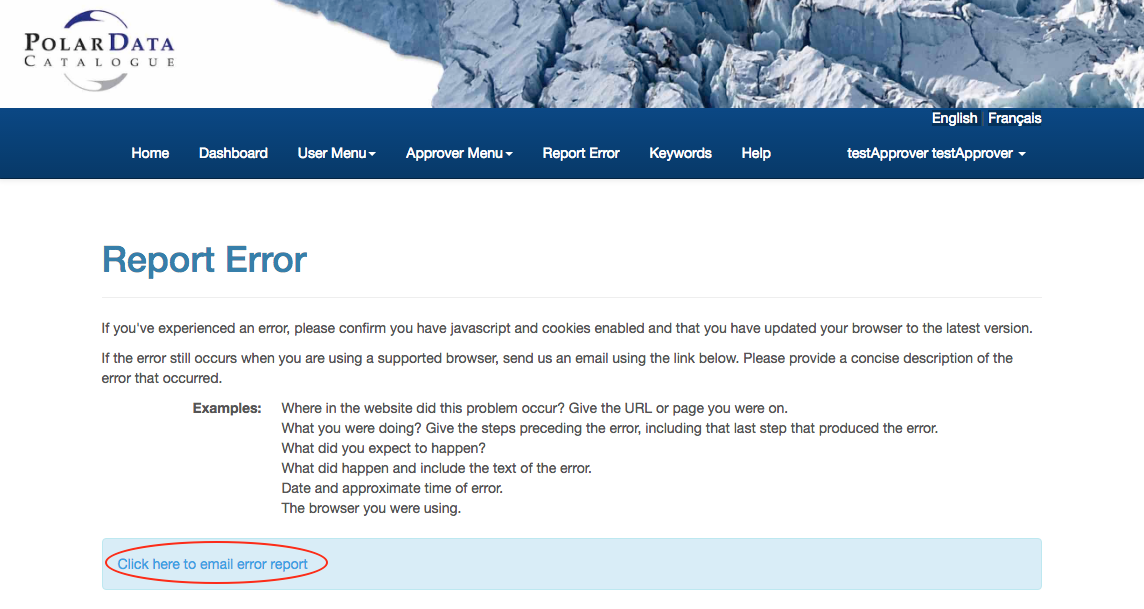
How do I report an error I experienced with the PDC?
Click on the “Click here to email error report” you will be directed to the email application installed on your computer. You can also right click to get the option to copy the email address and send the email through your browser. Send us an email describing the error you received. You will need to include your email address so we know whom to contact once the problem is resolved.
- Please provide a clear and detailed description of the error that occurred, by answering the following questions:
- What page were you on? Please provide the URL or name of the page.
- What were you doing? Please provide your steps preceding the error, as well as your last steps that produced the error.
- What happened? Please include the text description of the error.
- When did this happen? Please provide the date and approximate time of the error.
Note: Some errors occur as a result of the usage of an unsupported browser, or if you do not have JavaScript or cookies enabled.
Metadata and Data
- What is Metadata and why is it important?Metadata is basically data about data. Metadata provides the what, where, when of data and by whom it was collected, as well as its current location. Metadata facilitates the understanding, use, and management of data, and is a tool for networking and collaboration. Standardized metadata is an internationally confirming standard of information fields that must be included within the metadata to allow interoperability between metadata management facilities.
- How soon can I find new metadata in the PDC Search tool?If an approved record is updated and “REAPPROVED,” the search tool updates and provides the new metadata online immediately.
Quality Assurance
- Why do metadata and data files need to be reviewed and approved?Before data is publicly available through the PDC search tool, the record is checked for quality assurance. This is to ensure that the record is documented in a robust way without errors . After users create and submit metadata, they are sent to the PDC Data Specialist to be reviewed. Once approved records are findable through any of the search tools.
Part III: Submit Metadata and Data
The PDC is a repository designed for the safe storage of metadata and datasets, and continual curation ensures the long-term preservation of its records.
Metadata is basically data about data. Metadata provides the what, where, when of data and by whom it was collected, as well as its current location. Metadata facilitates the understanding, use, and management of data, and is a tool for networking and collaboration. The Polar Data Catalogue follows the FAIR (Findable, Accessible, Interoperable, and Reusable) principles. These principles state that it should be possible to find research data, there should be information about how to gain access to them, they should be compatible with other data, and possible to reuse. Standardised metadata is an internationally conforming standard of information fields that must be included within the metadata, to allow interoperability between metadata management facilities.
This document guides you through the process of adding new metadata and data records into the Polar Data Catalogue (PDC) using the online data entry system. The PDC also provides the interface to manage all your metadata and data records. The three functional components are “Submit Metadata,” “Submit Data,” and “My Metadata.” In the following section each part is described in detail.
To submit or edit metadata, and/or data, data “owners” must be registered with the PDC. The Registration form can be found via the PDC Welcome page "Submit Data" button or directly on the PDC Input page. Select “Register for PDC” in the navigation menu. Following your form submission, you will recieve an email containing a link to verify your email address.
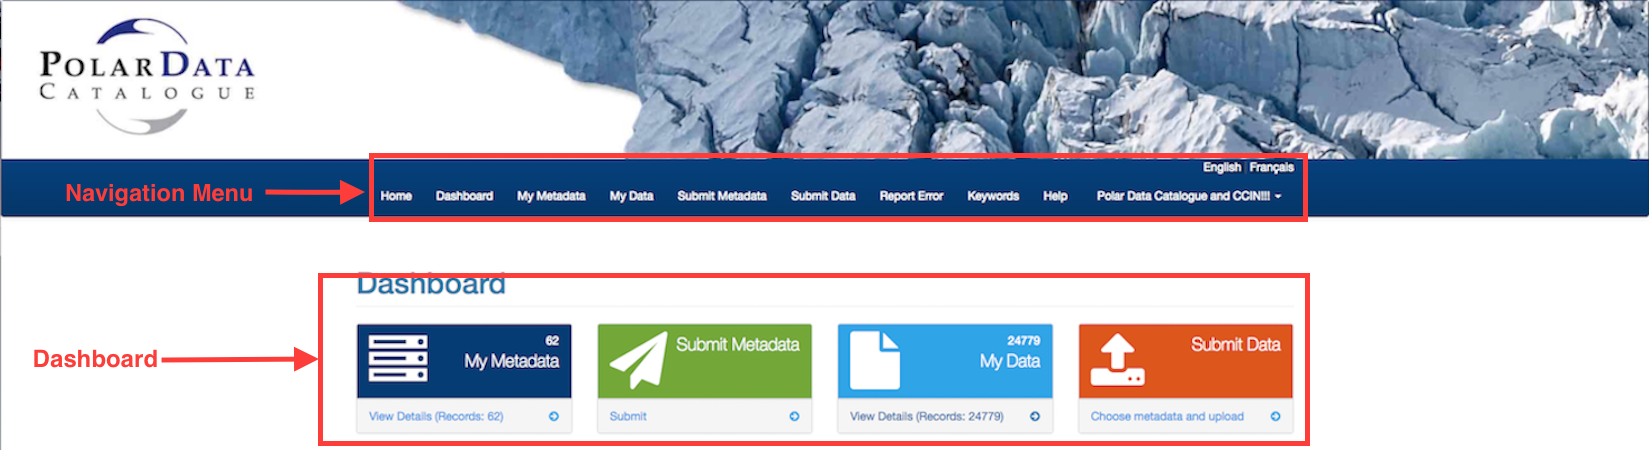
After registering for the PDC, and signing into your PDC account, you will see several options related to data management on the Dashboard, or in the navigation menu. [Note for students: It is suggested that you log in (or register, for first time users) using your supervisor’s email address. The email address is the main link to the laboratory’s records, and thus will remain the most reliable and constant contact for the future.]
Submit Metadata
A good, robust metadata record provides as many details as possible about the resource that is being described. The information that is required for a standardised PDC metadata record include:
- Title
- Citation - (how you want this record to be cited by others)
- Study Site - (including the Canadian Geographical Names Database unique identifier)
- Purpose
- Abstract
- Responsible Parties - (we suggest these are all listed in your citation)
- Links to Data
- Status
- Maintenance and Update Frequency
- Research Program(s)
- Research Area
- Time Period
- Keywords
- Data Access Security
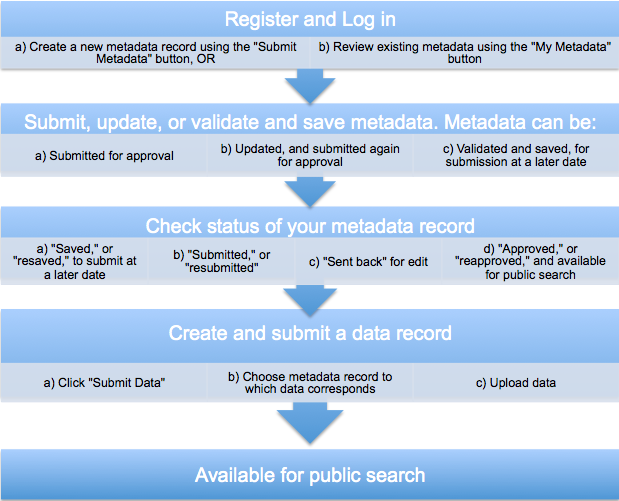
After the metadata records are created and saved please ensure they are submitted. Once submitted, the quality of the metadata will be reviewed. When they are approved, the metadata record will be available to the public through the PDC Search Tool. This process is described in the flowchart below:
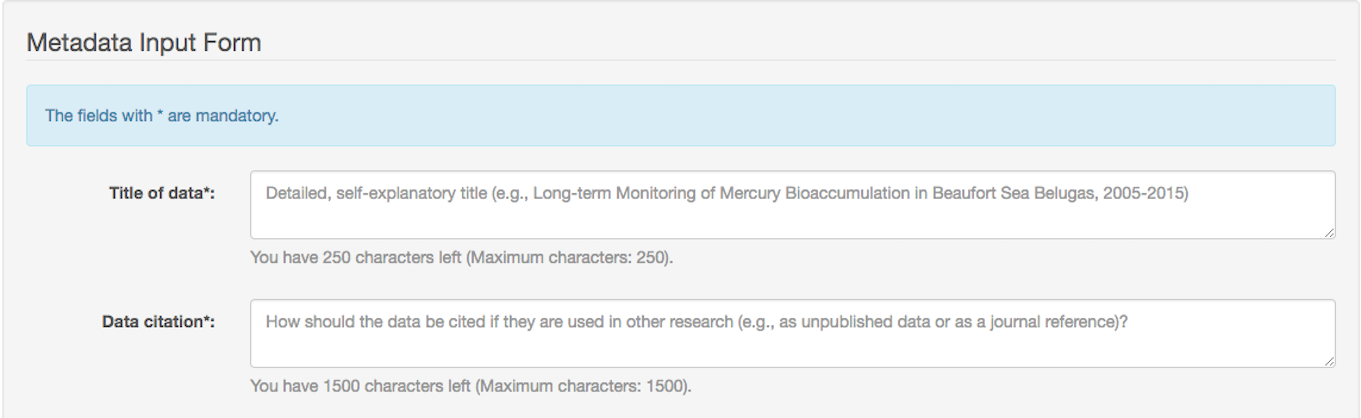
An online input form is provided for the data owners to enter their metadata. Please refer to the “Descriptions of required information in Metadata Input Form” for further clarification of each field.
Additionally, Metadata Input Form templates (Text file and Word file) are provided, that allow you to fill in the form offline, and then to copy and paste the information into the online form. All fields of the online form need to be completed before your record can be saved and submitted.
The following documents should be reviewed for more detailed guidance for creating a metadata record:
Instructions for Creating Metadata
Completed Metadata Input Form Example
PDC Best Practices – Complete Guide
All of these documents can be found under the “Help” link in the navigation menu on the PDC Input page.
Creating a new metadata record:
Log in (or Register, for first time users) to the PDC using your registered email address.
Select “Submit Metadata” from the Dashboard or from the dropdown User navigation menu.
Fill in the Metadata Input form. All the fields with an asterisk (*) are mandatory.
Validate and save metadata record by selecting the “Validate and Save” button at the bottom of the Metadata Input Form.

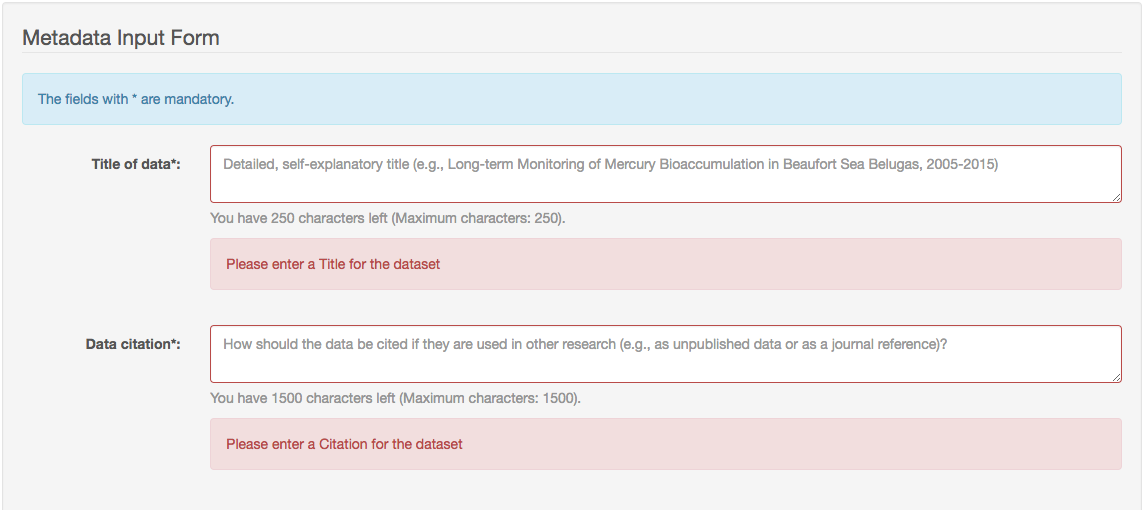
If there are any errors, you will be returned to the form, and the errors will be highlighted in red to indicate the field(s) that must be modified.
A screen indicating “Record created and saved successfully” will appear if no errors were present in the metadata. You will be given four options to choose from:
- Submit Metadata
- Submit data for the metadata record
- View or Update the metadata record
- View the list of metadata in the “My Metadata” page
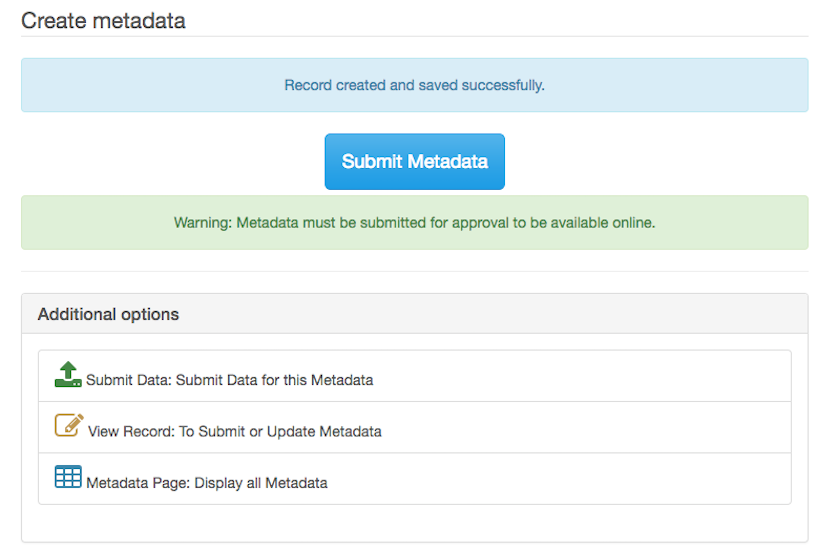
When you are satisfied with the metadata, you can submit the metadata record by selecting “Submit Metadata” on the “Record created and saved successfully” page. If you would like to SUBMIT or UPDATE a record that was previously SAVED, select the metadata record on the “My Metadata” page and select “Submit” or “Update” at the bottom of the Metadata Input Form. Additionally, if you would like to create another metadata record similar to the record that is already saved, select “Similar Entry” at the bottom of the Metadata Input Form. This will create a duplicate of the record (with a new CCIN reference number) that can be edited as necessary.

The submission will be reviewed. The record status will then update to “Approved” , or “Sentback” (for major changes). “Edit” or “Update” (for minor errors) can be done with email notifications. After approval, the record will be available to the public, through the PDC Search Tool. If the metadata record is sent back, you will receive an email explaining the reason(s) why. The metadata can be edited on the “My Metadata” page and submitted again for approval. Please note: a submitted metadata record cannot be edited again by the user until it is approved or sent back.
Please note that if you do not submit your metadata, the record will be marked as “SAVED” in the “My Metadata” page, but will not be available online. Only when the record is “SUBMITTED”, reviewed, and then “APPROVED”, will it be available online. Don’t forget to go back and “Submit” your metadata once you are satisfied with it, as this is a common mistake made by users.
Submit Data
A good, robust dataset is preferably submitted in a nonproprietary format. You should also consider the quality, quantity, and relevance of your data and avoid data that is incomplete. Any missing value identifiers, or errors in your data, should be identified in your README file. Missing values can be identified in several ways, NaN (Not a Number), NR (No Result) or by using a specified extreme value not likely to be confused with a measured value (e.g., -9999).
Please ensure that your data files are accompanied by a detailed README file in either .txt or .pdf format. A .txt template is provided, that will allow you to easily create a README file:
A README is a text file that introduces and explains your project. It contains information that is required for others to understand what the project’s data is about. It can answer questions that users may have regarding how to reuse your data, and is especially valuable for the long term preservation of robust data.To upload data to a metadata record:
Select “My Metadata” or “Submit Data” from the Dashboard or the navigation menu. Select “Submit Data” next to the metadata record for which you want to upload corresponding data.
You can either navigate to the data files by selecting “Choose multiple files,” or you can drag and drop the files to upload them. You can submit any number of files; however, the maximum size for each file is 700 MB. If data files are larger than 700 MB, please contact us at pdc@uwaterloo.ca.
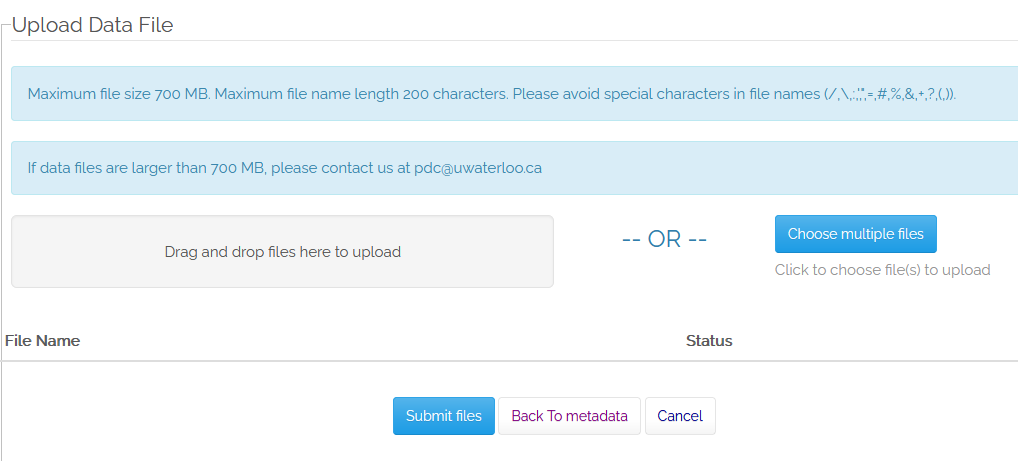 When you submit a file, you will see a process bar appear for the file, to notify you when the file is submitted.
The PDC Data Specialist can approve, upload or delete (with prior emailed approval from the submitter) files for the metadata record. The data will then be available to the public through the PDC search, if the Data Security for the data is set to “Public” in the metadata record. If the Data Security is set to “Limited,” only the submitter, and Data Specialist, will have access to the data.
There are 6 options to limit data:
- Limited: data involve human subjects
- Limited: data involve intellectual property issued related to local or traditional knowledge
- Limited: release of data may cause harm to the environment or the public
- Limited: pre-existing data have been used and are subject to access restrictions
- Limited: unpublished and/or currently under review for publication
- Limited: other
If your data is Public and Archived in the PDC, a DOI will be assigned to it (if it does not already have one assigned).
My Metadata
“My Metadata” on the Dashboard, or navigation menu, allows for metadata management. It contains a table with a list of your metadata records, their CCIN reference numbers, status, date they were created and last modified, and the link to the data files associated with the metadata record.
The CCIN reference number is a unique identification number that is assigned automatically when a metadata record is created.
Metadata can have different statuses, which include:
- “SAVED” (metadata has been validated and can be edited prior to submission)
- “SUBMITTED” (metadata has been submitted for review and approval)
- “APPROVED” (metadata has been approved and is now publicly visible in the PDC Search website)
- “SENT BACK” (metadata has been returned to the creator for editing)
- “RESAVED,” “RESUBMITTED” and “REAPPROVED” (the metadata has been previously approved and updated)
My Data
You can view all your uploaded data to date by selecting “My Data” in the Dashboard or the navigation menu.
The CCIN reference number is assigned automatically when a data file is submitted to a created metadata record.
Data can have different statuses, which include:
- “WAITING FOR METADATA APPROVAL” (metadata has not yet been approved)
- “SUBMITTED” (metadata has been approved, data is awaiting review and approval)
- “APPROVED” (metadata and data has been reviewed and approved, and is publicly visible in the PDC Search website if the data security is set to 'Public')
Updating Records
Metadata
You can view all your uploaded metadata records to date by selecting “My Metadata” in the Dashboard or the navigation menu.
Each record can be viewed by clicking on the title. If you need to update any of the metadata fields scroll to the end of the record and use the UPDATE button to bring up the Update Metadata Form. Make your changes then use the UPDATE button at the end of the form to save your changes. You will then be prompted to SUBMIT your record. This will change the metadata record status to SUBMITTED or RESUBMITTED and will go through the metadata approval process.
RECORDS IN "SUBMITTED" STATE CANNOT BE UPDATED. Please contact pdc@uwaterloo.ca to have the record returned to you to update.
Data
Data files can only be removed by the PDC Data Specialist with your permission. "APPROVED" files are never removed to protect the data version.
- “WAITING FOR METADATA APPROVAL” (metadata has not yet been approved)
- “SUBMITTED” (metadata has been approved, data is awaiting review and approval)
These files are able to be deleted. New/updated copies of the files can be uploaded using the "Submit Data" menu option.
- “APPROVED” (metadata and data has been reviewed and approved, and is publicly visible in the PDC Search website if the data security is set to 'Public') - these files are NOT deleted, new or updated files must be added with a version "_V2" (for example)added to the file name. The README must also be updated to reflect the changes including a brief summary of the amendments.
Data Sovereignty
Data Sovereignty is the concept that data is subject to the laws of the country or region where it was generated.
Indigenous Data Sovereignty describes the fundamental rights of Indigenous Peoples' to control, access, interpret, manage, and collectively own data about their communities, lands, and cultures. The foundations for Indigenous Data Sovereignty rest on Indigenous Peoples' inherent rights to autonomous governance. Information management and data collection strategies must align with the practices and cultures of the Indigenous Nations, communities, or Peoples who are represented in the data.
Metadata:
The “plain language summary” field can be used to add the abstract in an alternative language (for example Inuit, or French, or English if the submission is in French).
Under Responsible Parties indigenous persons can be listed with whichever role fits. Originator, Principal Investigator, Collaborator or Point of contact. They can also be named as the party under the Links to Data.
Data:
There are a variety of categories to restrict data file access under Data Secrurity field of the Metadata.
The options to limit data:
- Limited: data involve human subjects
- Limited: data involve intellectual property issued related to local or traditional knowledge
- Limited: release of data may cause harm to the environment or the public
- Limited: pre-existing data have been used and are subject to access restrictions
These allow data files to be securely stored within PDC and will indicate that data is there but will NOT be publicly accessible. “limited” will display in the data column but when clicked will display the following:
Limited Access Data > Access to this dataset has been limited by the contributor. For access, please contact the Contact Person or Responsible Parties below.Details are provided for the contact.
Part IV: Frequently Asked Questions
User Interface
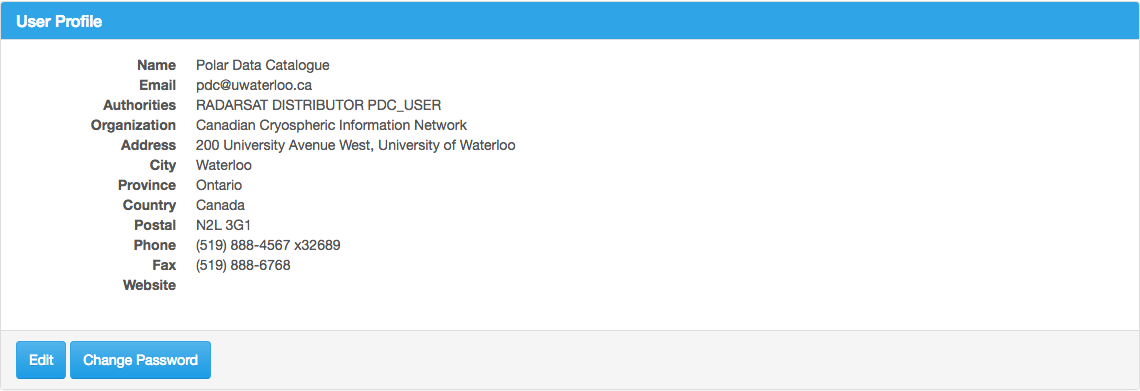
- How do I change my login information?Once you are logged into the PDC input, select “Profile” from the drop-down menu in the navigation menu.
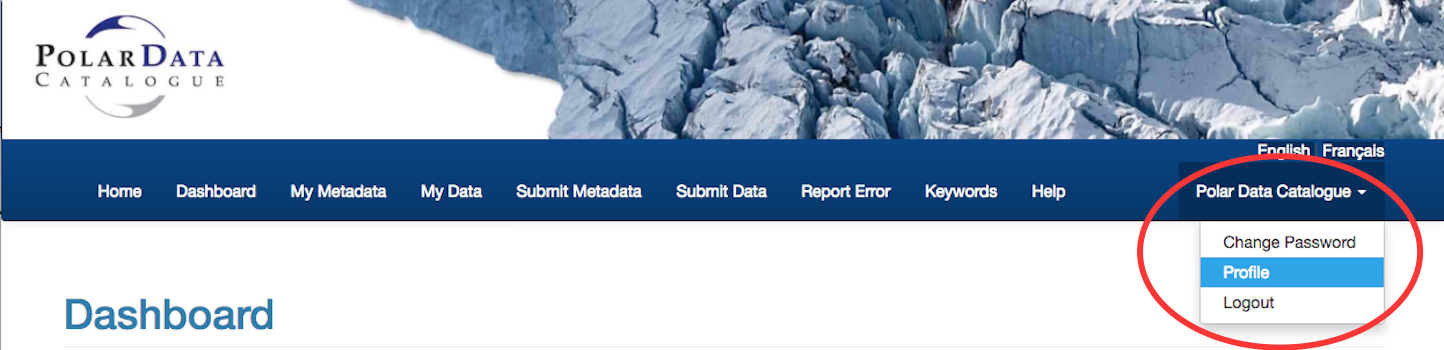
You will then be able to edit your profile by selecting “Edit” or change your password by selecting “Change Password.” You have access to change every field, except for your email address (due to security reasons).
If your PDC account is registered with an email address that you no longer have access to, or will no longer have access to, contact pdc@uwaterloo.ca, please do not create a new account with a new email address.
- What if I forgot my password?On the home page of the PDC input, click the “Forgot Password” next to the sign in fields. Enter your email address, and you should receive an email with a new temporary password link to reset your password.

Enter your new password in the “Password” and “Password again” fields and click “Submit.” You will be directed to the PDC input page. Verify that your new password allows you to log in to your account.
- How do I report an error I experienced with the PDC?Once you are signed in to the PDC input, there is a “Report Error” option in the navigation menu.

Click on the “Click here to email error report” you will be directed to the email application installed on your computer. You can also right click to get the option to copy the email address and send the email through your browser. Send us an email describing the error you received. You will need to include your email address so we know whom to contact once the problem is resolved.
- Please provide a clear and detailed description of the error that occurred, by answering the following questions:
- What page were you on? Please provide the URL or name of the page.
- What were you doing? Please provide your steps preceding the error, as well as your last steps that produced the error.
- What happened? Please include the text description of the error.
- When did this happen? Please provide the date and approximate time of the error.
Screen shots can also be included in your email. They can prove very useful, particularly if we need to recreate the senario to investigate the error.
Note: Some errors occur as a result of the usage of an unsupported browser, or if you do not have JavaScript or cookies enabled.
Metadata and Data Entry
- What is Metadata and why is it important?Metadata is basically data about data. Metadata provides the what, where, when of data and by whom it was collected, as well as its current location. Metadata facilitates the understanding, use, and management of data, and is a tool for networking and collaboration. Standardized metadata is an internationally conforming standard of information fields that must be included within the metadata to allow interoperability between metadata management facilities.
- What information is required to submit metadata?Please refer to the “Descriptions of required information in Metadata Input Form,” available on the PDC’s Help page.
- How do I submit metadata and data?
- Log in to the PDC and click the “Submit Metadata” option on the Dashboard or in the navigation menu.
- Fill out the Metadata Input Form completely and appropriately.
- Validate and save the metadata record.
- Submit data to accompany the metadata record, if available.
- Submit the metadata record and wait for approval. If your record is sent back, make the required changes and submit the record again.
- How do I view my metadata records?Log in to your account in the PDC and click the “My Metadata” option on the Dashboard or in the navigation menu. You will be directed to a table which contains all your metadata records.
- How do I view my data files?Log in to your account in the PDC and click the “My Data” option on the Dashboard or in the navigation menu. You will be directed to a table which contains your data files corresponding to your metadata records.
- How do I update my metadata?Metadata can only be edited if it is “SAVED,” “APPROVED”, “REAPPROVED” or “SENTBACK.” You cannot update “SUBMITTED” metadata. Log in to your account in the PDC and click the “My Metadata” option on the Dashboard or in the navigation menu. Select the metadata record you want to update. Click the “Update” button at the bottom of the record. Make the required changes and click “Update.” You will then be prompted to “Submit Metadata.” Click this button and resubmit the metadata. The updated metadata will then be resubmitted to the Data Specialist for review.
- Is there a way I can upload several similar metadata records without typing the same information each time?Click on the metadata record you would like to copy from your “My Metadata” page. Scroll to the bottom of the record and click on the “Similar Entry” button.
- I need a keyword or research program that isn't in the drop-down list. What do I do?Please send an email to pdc@uwaterloo.ca.
- Why do I receive emails from the PDC?Users who create metadata or submit data files may receive an email when their metadata records are “SUBMITTED,” “RESUBMITTED,” “APPROVED,” “REAPPROVED, OR “SENTBACK,” .
- What happens after my metadata is reviewed by the Data Specialist?Once reviewed, each metadata record will be “APPROVED,” “REAPPROVED,” “UPDATED,” OR “SENTBACK.”“
- Approved: Metadata record is approved and will be searchable online through the PDC Search Tool shortly.
- Reapproved: latest version of Metadata record is approved and will be searchable online through the PDC Search Tool shortly.
- Update: the Data Specialist may make small changes and save the record again.
- Sent back: If significant changes are required, the record will be sent back to the submitter.
- What happens if the Data Specialist does not approve my metadata?The Data Specialist will email you directly with details for improving your metadata, or your metadata will be “SENTBACK” with comments/changes to be made to improve your submission.
- How soon can I find my approved metadata in the PDC Search tool?If a record is “APPROVED,”, or updated and “REAPPROVED,” the search tool updates and provides the new metadata version online immediately.
Quality Assurance
- Why do metadata and data files need to be reviewed and approved?Before data can be publicly available through the PDC search tool, the record needs to be checked for quality assurance. This is to ensure that the record is robust and documented in a standardised format. After users create and submit metadata, they are sent to the Data Specialist. The Data Specialist can “APPROVE,” “UPDATE,” or “SEND BACK” the record to the submitter for major revisions.
- Who is the Data Specialist?The Data Specialist is appointed by the PDC to review and approve submitted metadata and data records. The PDC Data Specialist is responsible for approving metadata and data records. The Data Specialist can see the “Approve Metadata” and “Approve Data Files” tabs.
- What functions does the Data Specialist have?The Data Specialist can:
- Approve - Metadata record is approved and will be searchable shortly.
- Update - Approver may make small changes and save record again.
- Send back - The record will be sent back to the submitter, with suggestions for improvements.
- Delete - Metadata record or data files can be permanently removed (with email permission from submitter) unless the record has already been approved.